

6 Steps to Style a Wolf Cut as It Grows Out
A stylist's six-step plan for the wolf cut grow out men actually want — phase timeline, product swaps, finger-lift technique, trim cadence, and the mushroom rescue tactics that keep it sharp.
In this article · 17
- What Actually Happens When You Grow Out a Wolf Cut
- What You'll Need
- Step 1: Map Every Grow-Out Phase Before Week One Ends
- Step 2: Rotate Your Product Mix as the Layers Lengthen
- Step 3: Finger-Lift the Crown Every Morning
- Step 4: Book a Shape Trim Every Five to Six Weeks
- Step 5: Rescue the Mushroom Weeks (Weeks Six to Ten)
- Step 6: Steer Toward the Final Silhouette
- Troubleshooting: When the Grow-Out Goes Sideways
- What to Do Next
- FAQ
- How long does it take to grow out a wolf cut for men?
- What is the awkward stage of a wolf cut grow-out?
- Should I get my wolf cut trimmed while growing it out?
- What products should men use during a wolf cut grow-out?
- How do I keep my wolf cut fringe out of my eyes while it grows?
- When should I stop growing out my wolf cut and reset the shape?
Growing out a wolf cut is a six-month project most guys underestimate. The layered engineering that made the fresh cut work stops working around week six — the crown flattens, the fringe blinds you, and the back stalls just above the collar. Below is the stylist plan I hand every client sitting in my chair mid-grow-out: six steps, the exact product swaps for each phase, the trim cadence that keeps the shape alive, and the rescue moves for the mushroom weeks. Follow all six and the wolf cut grow out men actually want — a longer, textured mullet-wolf hybrid — arrives on schedule instead of by accident.
What Actually Happens When You Grow Out a Wolf Cut
A wolf cut is engineered around three parts working in balance — internal crown layers, cheekbone face-framing, and a longer textured back grazing the collar. Everything lengthens together at roughly half an inch a month. The catch is that each part reads differently as it grows. The crown flattens first because gravity pulls weight down. The fringe outruns the cheekbone in about four weeks. The back drifts past its point-cut perimeter and stacks into a blunt slab if you leave it alone.
The wolf cut grow out for men splits cleanly into four phases. Weeks one to four are the fresh-cut sweet spot. Weeks five to ten are the mushroom stretch — the ugliest of the four. Weeks eleven to sixteen land in shag territory, where the shape starts reading intentional again. Weeks seventeen onward are the full wolf-mullet hybrid, which is the endgame most guys are aiming for whether they realize it at week one or not.
The six steps below are ordered by when you need them. Steps one and two set the timeline and product base before week four. Step three is a daily habit that runs the whole grow-out. Step four is the trim cadence. Steps five and six rescue the mushroom weeks and steer the final silhouette. Skip any of them and the shape drifts — usually right into a triangle back you can't recover without a full reset.
What You'll Need

Keep the kit small. Wolf cuts are engineered to work light, and every extra tool is one more thing to accidentally overuse. This is the whole list.
- A matte clay or matte cream — pea-sized amount for hold on the crown.
- A sea-salt spray — two pumps for movement through the mid-lengths.
- A lightweight, flexible-hold hairspray — one pass for long days only.
- A blow-dryer with a concentrator nozzle, plus a diffuser attachment if your texture is wavy or curly.
- A wide-tooth comb, used only on the front pieces or fringe.
- Three saved reference photos — front, side, and back — of the final wolf-mullet you're aiming for.
- A standing salon appointment every five to six weeks, booked before you leave the current one.
Skip high-shine pomade, wet-look gel, fine-tooth combs, and anything that promises "shine and hold." All four flatten the layered separation the shape depends on. Pick one product per category and stop shopping.
Step 1: Map Every Grow-Out Phase Before Week One Ends
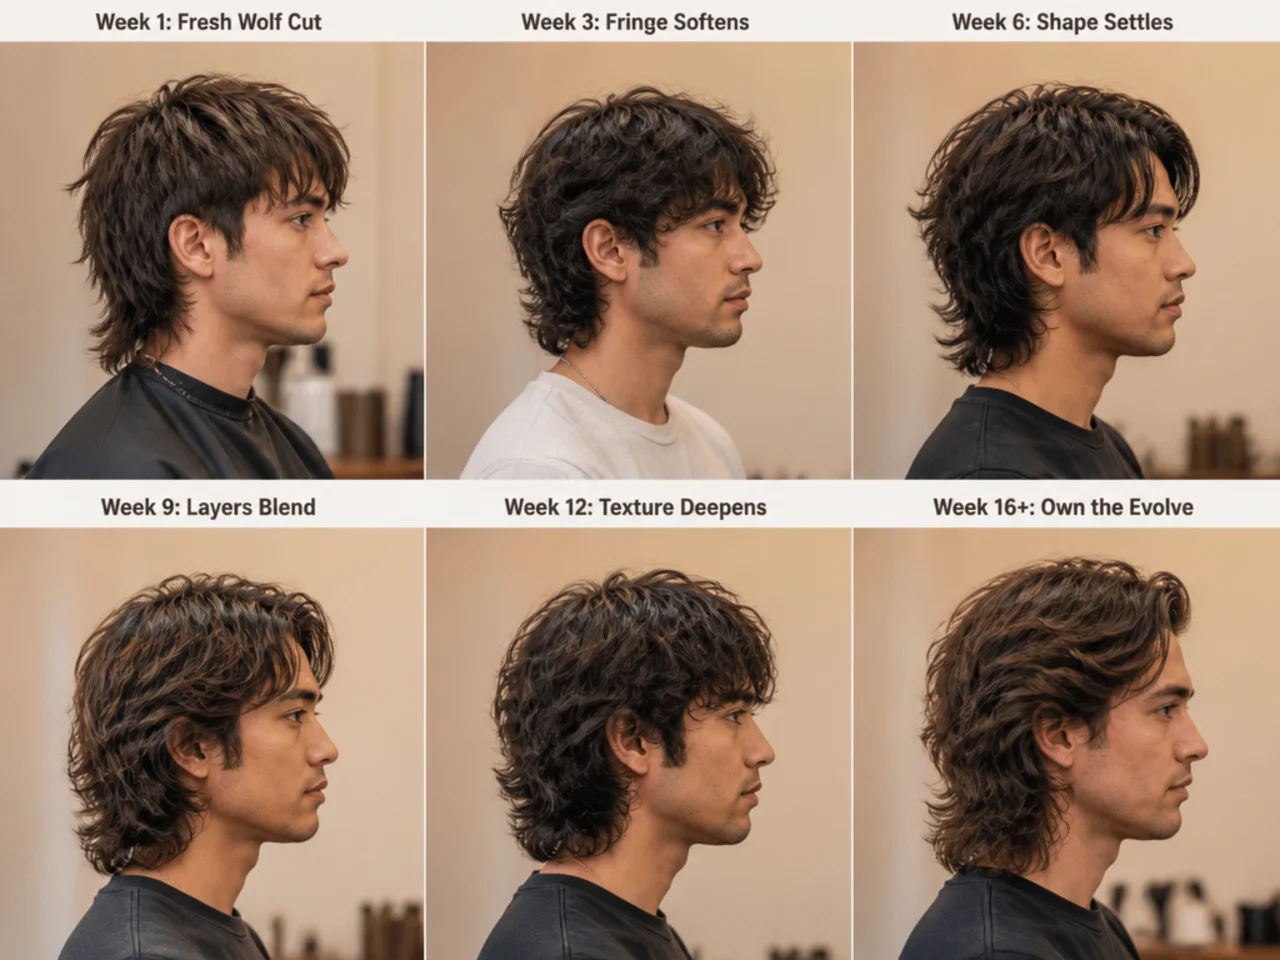
Set the expectations before you're in the middle of a phase. Hair grows roughly half an inch a month, so the math is honest — a three-inch crown reaches five inches at sixteen weeks and six inches at twenty. Your back length gains the same half inch. Everything else about the cut is engineered around that predictable growth.
What you're doing: open a note on your phone and write the four phase windows against real calendar weeks. Phase one, weeks one to four, is the freshly-cut sweet spot. Phase two, weeks five to ten, is the mushroom stretch. Phase three, weeks eleven to sixteen, is the shag phase. Phase four, weeks seventeen onward, is the full wolf-mullet. Photograph your hair front, side, and back on the day you leave the salon. Photograph again at the start of every phase.
Why: grow-outs feel worse than they are because week seven looks bad against week two in your memory, not against week seven in a photo. The phase log turns "my hair looks weird" into "I'm at day forty-two of the mushroom stretch, which resolves at day seventy." That mental frame keeps you from getting a rescue cut you'll regret.
Common mistake: guessing the phase from feel. Guys who stop tracking end up cutting their length off during week eight because it "feels stuck." It's not stuck — it's mid-grow. Two weeks later they've paid to restart the timer they were nearly through.
Step 2: Rotate Your Product Mix as the Layers Lengthen

The three products in the What You'll Need list get used differently in each phase. Same shelf, different rotation.
What you're doing: in phase one, matte clay or cream only — pea-sized amount, worked through damp hair with fingertips, no spray. In phase two, add the sea-salt spray on the mid-lengths to fight the mushroom flattening. In phase three, drop the clay amount by half and lean on the salt spray for movement. In phase four, most days you only need the salt spray plus a single pass of the lightweight hairspray on evenings you'll be out late.
Why: the layers get heavier as they grow. A pea-sized clay that lifted a fresh three-inch crown will drag a five-inch crown down. The salt spray builds bulk and separation without adding weight, which is exactly what a lengthening layered cut needs. Hairspray comes in only when the length starts fighting rain, humidity, or a long day of head-turning.
Common mistake: buying a new product for every problem. Most guys triple their bathroom shelf during a wolf cut grow-out because each phase feels like it needs "something." It doesn't. The three-product rotation covers every phase — the only variable is how much you use of each, when.
Step 3: Finger-Lift the Crown Every Morning

This is the single daily habit that separates a wolf cut grow-out that reads intentional from one that reads accidental. It costs nothing, takes ten seconds, and no product hack can substitute for it.
What you're doing: after towel-drying, work your fingertips into the roots at the crown and lift the hair straight up while it's still damp. Do the same to the back — grip the underside of the length and shake it outward, not down. Air-dry the rest of the way, or use a blow-dryer on medium with a concentrator nozzle pointed at the roots.
Why: the internal crown layers were point-cut to sit lifted rather than lie flat. Combing them cancels that engineering. Fingertips do the reverse — they build height at the roots and let the mid-lengths fall into their layered shape naturally. A wolf cut without root lift reads as a bad haircut instead of a growing one, and the mistake is almost always the comb.
Common mistake: using a fine-tooth comb on the crown out of habit. The fine teeth drag every layer down to its longest point and flatten the shape you're trying to protect. Keep the wide-tooth comb for the fringe and front pieces only. Everything from the temples backward gets fingers.
Step 4: Book a Shape Trim Every Five to Six Weeks
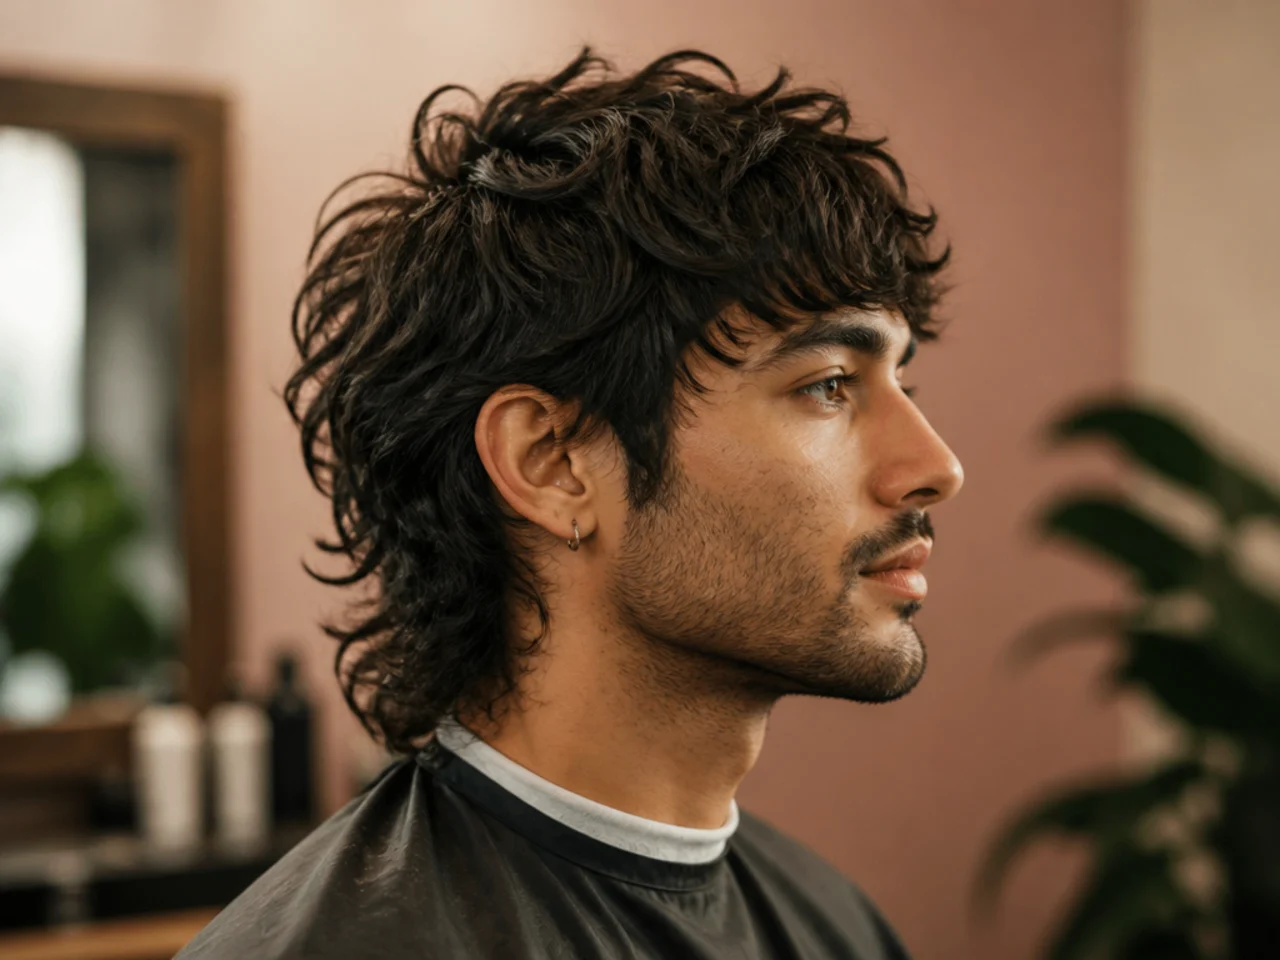
The trim schedule during a grow-out is the opposite of what most guys assume. You cut more often, not less, and each visit removes almost no length. The point is to keep the shape alive while everything else lengthens.
What you're doing: book a shape trim — not a full cut — every five to six weeks for the entire grow-out. Tell the barber to point-cut the perimeter, thin the internal crown layers, clean the sideburns, and touch up the fringe. Total length removed: a quarter inch off the ends, nothing more. Book the next appointment before you leave the current one.
Why: hair grows in unequal directions. The back typically outpaces the crown by about a quarter inch each cycle, and the sideburns creep faster than the top. Left alone for eight or ten weeks, the back stacks into a triangle, the sideburns hook forward, and the crown flattens under uneven weight. Five- and six-week trims reset the shape without eating into the length you're growing.
Common mistake: stretching to ten or twelve weeks because "there's nothing to cut yet." There's always something to cut — perimeter, sideburns, internal thinning — and once the triangle forms, no styling recovers it. See the modern wolf cut mistakes guide for the client stories that made this rule non-negotiable in my chair.
Step 5: Rescue the Mushroom Weeks (Weeks Six to Ten)

Weeks six to ten are the ugliest stretch of any wolf cut grow-out, and they're where most guys quit and go for a rescue chop. The tactics below carry you through without losing progress. Use them all — the mushroom weeks fight back if you leave any tool on the shelf.
What you're doing: blow the fringe backward off the forehead with a round brush and a shot of cool air, or split it into a soft center part. Push the front pieces behind the ears once they clear the cheekbones. Use a headband or a low-profile snapback for gym days and rainy commutes. Lean on the sea-salt spray heavier than in any other phase — the mushroom weeks are all about fighting flattening. Consider a mid-phase "fringe-only" trim at week eight if the front is blinding you but the rest is on schedule.
Why: the mushroom effect happens because the layered engineering has grown past its cut length but hasn't reached its next stable silhouette yet. It's a transition, not a failure. Every tactic above shifts weight, adds visible movement, or hides the flat crown until the length catches up. A shag haircut reference photo held up at the mid-phase trim also helps — it's the closest cut shape to what your hair is trying to become.
Common mistake: panicking and getting a rescue cut. The rescue cut always removes the crown length that you needed to reach the next phase. Two weeks later you're back to phase one on the calendar and month one on the grow-out. Ride the mushroom weeks with the tactics above. Phase three lands within four weeks and pays the discomfort back with interest.
Step 6: Steer Toward the Final Silhouette

By week sixteen the shape is close enough to the endpoint that the last few decisions actually matter. This step is the final chair conversation.
What you're doing: at your week-sixteen trim, pull up the original three reference photos and compare against what's on your head. Decide, out loud, whether you're stopping at the wolf-mullet hybrid length that most grow-outs land at, extending further to a long wolf cut, or stepping down into a straight modern mullet. Ask the barber to soften or sharpen the sideburn treatment to match — a scissor taper for workplace, a low taper fade or low taper fade for weekends and creative rooms. Confirm the ongoing trim cadence for the maintenance phase.
Why: the endpoint is a choice, not a destination. Different guys stop at different lengths, and the visual signature you locked in at week one — layered lift, cheekbone framing, textured back — carries into all three targets. Making the decision at week sixteen instead of week twenty-two prevents the shape from drifting two more phases past what actually suits you.
Common mistake: letting the barber pick. This is your cut and your commute. Bring the reference photos, name the target out loud, and confirm the side treatment matches the room where you spend the most hours each week. See the side-treatment guidance in the wolf cut mistakes guide if you're unsure which frame to pick.
Troubleshooting: When the Grow-Out Goes Sideways

Even with all six steps running clean, the grow-out surfaces problems. These are the five that come up most in my chair, and the exact fix for each.
Triangle back. The perimeter has closed up and stacked into a slab. Fix: book a same-week shape trim and ask specifically for the perimeter to be point-cut on the diagonal. Never let a barber blunt-cut a wolf perimeter.
Flat crown that won't lift. Cause is almost always combing, product overload, or blow-drying downward. Fix: swap to fingers for a week, cut the clay amount in half, and blow-dry pointed up from underneath. Add a satin pillowcase if you're not already using one.
Fringe in the eyes at week six. Fix: a diagonal point-cut on the fringe only — three to five minutes at the barber, no length off anywhere else. Or blow the fringe backward with a round brush and set with cool air. Both buy visibility without giving up length.
Sideburns hooking forward. They grow faster than the surrounding hair and start curling toward the face by week five. Fix: your five-week shape trim always includes a sideburn touch-up. Never let a barber leave them because "there's nothing to cut."
One side longer than the other. Common with straight hair, less obvious with waves or coils. Fix: mention it at the trim visit and ask for the shorter side to be left, the longer side evened down to match. Six weeks later they land together.
Random static and flyaways in dry weather. Fix: a single pump of light leave-in conditioner smoothed over the mid-lengths, not the roots. See the best wavy hair products guide for texture-safe options if your hair type sits in the wavy or curly range.
What to Do Next

If you're at the start of the grow-out, do the phase mapping today. Ten minutes with a phone note and one selfie session sets the entire timeline. Confirm the five-week trim slot with your barber before you leave the salon on your fresh-cut day.
If you're mid-grow-out and reading this in the mushroom phase, run the step five tactics for two weeks before you consider any bigger change. The phase almost always resolves faster than it feels. Pull the full wolf cut library up and pick your target photo now — even if you're still weeks away from it — so the next trim aims at a real endpoint.
If you're near the endpoint and picking the final shape, hold the version you want next to the current cut in the mirror. Guys who commit to a specific target — long wolf, wolf-mullet hybrid, straight mullet — land on it. Guys who "keep growing to see" drift past what suited them by about six weeks. Match your side treatment to your calendar, book the next trim before you leave, and treat the cadence as non-negotiable. That's the whole system. It works because it's simple, not despite it.
The cut you leave the salon with is worth about a month. The cut you keep for the next five months is entirely a product of what you do between visits — the finger-lift habit, the pea-sized product amounts, and the standing appointment. Every guy I've moved through a full wolf cut grow-out has landed on the same conclusion: the plan does more than the products, and the plan is what most of the internet leaves out. For style-adjacent context on how often to book across every cut in your rotation, the haircut cadence guide covers the numbers by cut family.
FAQ
How long does it take to grow out a wolf cut for men?
Three to five months of active grow-out from a freshly cut wolf to the full mullet-wolf hybrid most guys are aiming for. Hair grows about half an inch a month, so a three-inch crown reaches five inches at sixteen weeks. Standing trims every five to six weeks keep the shape from drifting into a triangle back or a flat crown.
What is the awkward stage of a wolf cut grow-out?
Weeks six to ten — the mushroom stretch. The crown loses lift, the fringe pushes past the cheekbones, and the back stalls just above the collar. It reads as a mushroom before it reads as a longer wolf. Step five above covers the specific rescue tactics — fringe back-blowing, headbands, heavier salt-spray use, and a mid-phase fringe-only trim if the front is blinding you.
Should I get my wolf cut trimmed while growing it out?
Yes, every five to six weeks — and ask for a shape trim, not a full cut. The barber point-cuts the perimeter, thins the internal crown, cleans the sideburns, and touches the fringe on the diagonal. Total length off: a quarter inch. Skip trims past eight weeks and the back stacks into a triangle you can't recover without losing weeks of grow-out.
What products should men use during a wolf cut grow-out?
Three items cover the entire timeline. A matte clay or matte cream for crown hold, a sea-salt spray for movement through the mid-lengths, and a lightweight flexible-hold hairspray for long days. Skip high-shine pomade, wet-look gel, and anything with a heavy hold rating — they flatten the layered separation the shape depends on.
How do I keep my wolf cut fringe out of my eyes while it grows?
Blow the fringe backward with a round brush and a cool-air shot, split it into a soft center part, or tuck the front pieces behind the ears once they clear the cheekbones. If the fringe hits your lashes before week eight, book a five-minute fringe-only trim — point-cut on the diagonal, no length off anywhere else. That buys you visibility without giving up grow-out progress.
When should I stop growing out my wolf cut and reset the shape?
Two triggers. When the back passes your shoulder blade — the layered engineering has run out of runway and every trim starts feeling like a fight. Or when the crown flattens under its own weight and finger-lifting stops working. At that point, book a full reset. Either commit to a proper long wolf, step down into a modern mullet, or reset to a fresh wolf and restart the timeline.



