15 Hair Sketch Tutorial Exercises That Build Real Volume
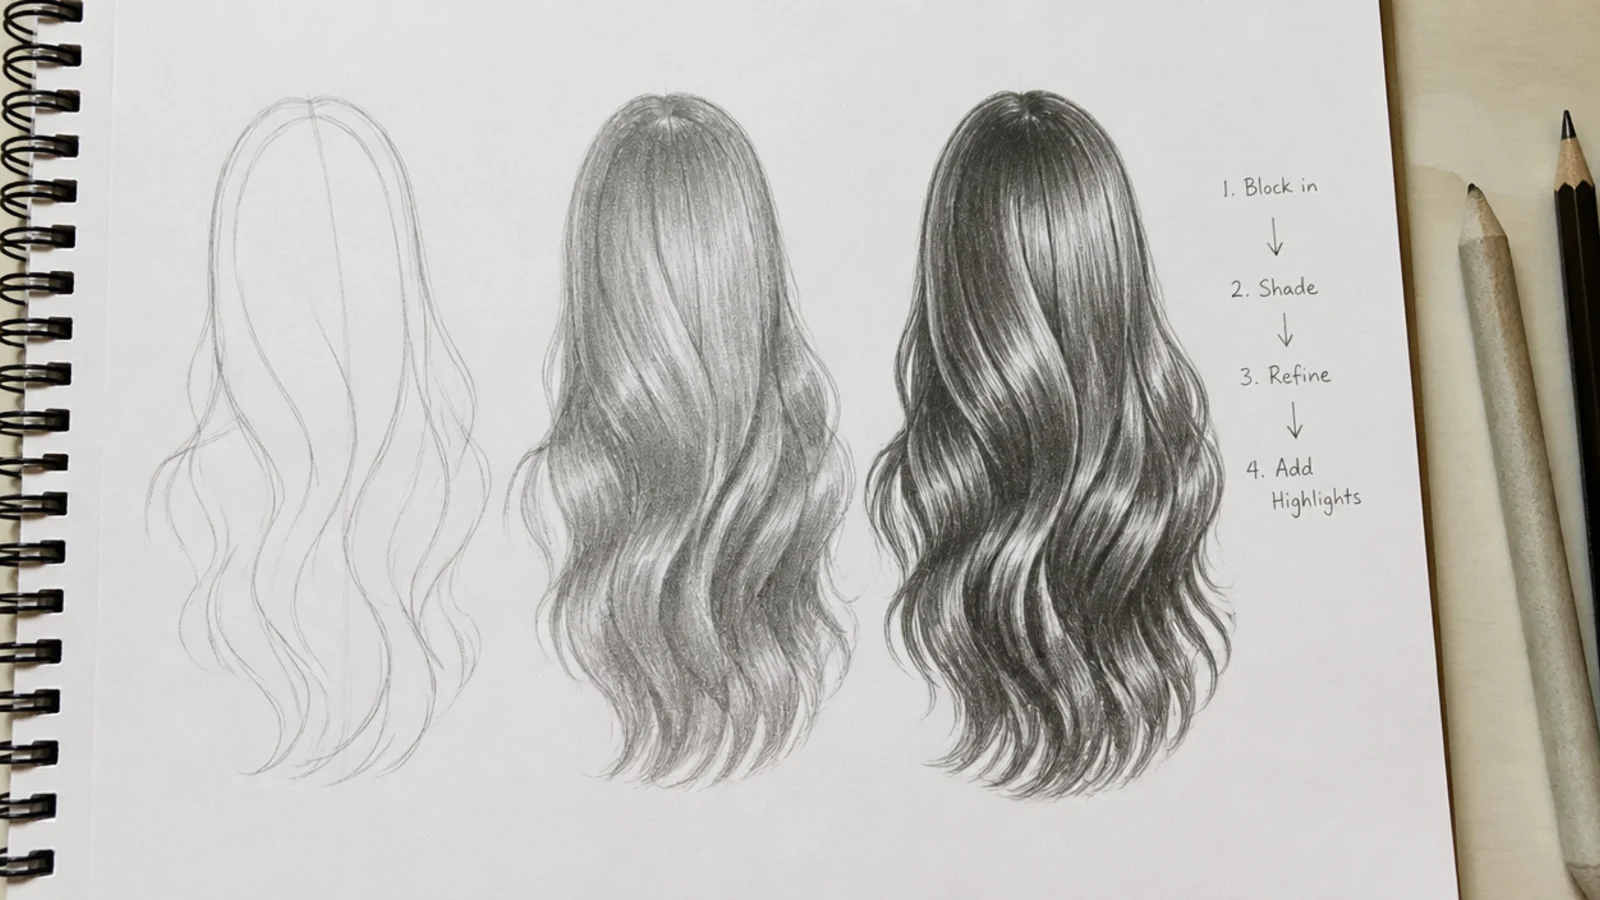
Fifteen graded exercises plus the eight step order that fixes flat hair. The distinction most beginners miss is that hair is a mass with a value structure, not a count of lines, and drawing the lines first guarantees a wig.
In this article · 32
- Pencils Paper and Tools
- Starting With Shape Before Strands
- Shading for Volume and Depth
- Straight Wavy Curly and Coily
- Using References
- Common Mistakes and Fixes
- The 15 Hair Sketch Exercises
- 1. Straight Long Front View
- 2. Wavy Shoulder Length
- 3. Curly Ribbon Method
- 4. Coily 4C Afro
- 5. Short Hair Side View
- 6. Boys Textured Crop
- 7. Messy Bun Back View
- 8. High Ponytail in Motion
- 9. Three Strand Braid
- 10. Curtain Bangs on the Forehead
- 11. Shading Blonde Hair
- 12. Anime Hair Spikes
- 13. Locs and Twists
- 14. Wind Blown Hair
- 15. Small Scale Hair
- How to Sketch Hair Step by Step
- Step 1. Skull and Hairline
- Step 2. Block the Silhouette
- Step 3. Flow Lines
- Step 4. Sections
- Step 5. Mid Tones
- Step 6. Dark Cores
- Step 7. Strands and Flicks
- Step 8. Check and Fix
- Final Thoughts
Most hair drawings fail before a single strand goes down, because the strands were the first thing on the page.
Hair is a mass with a value structure, not a bundle of lines. The eye identifies it from silhouette and shadow long before it registers any individual strand.
The order is shape, flow, value, then strands. Reverse any two of those and you get a drawing that looks like a wig sitting on a head rather than hair growing out of one.
Pencils Paper and Tools
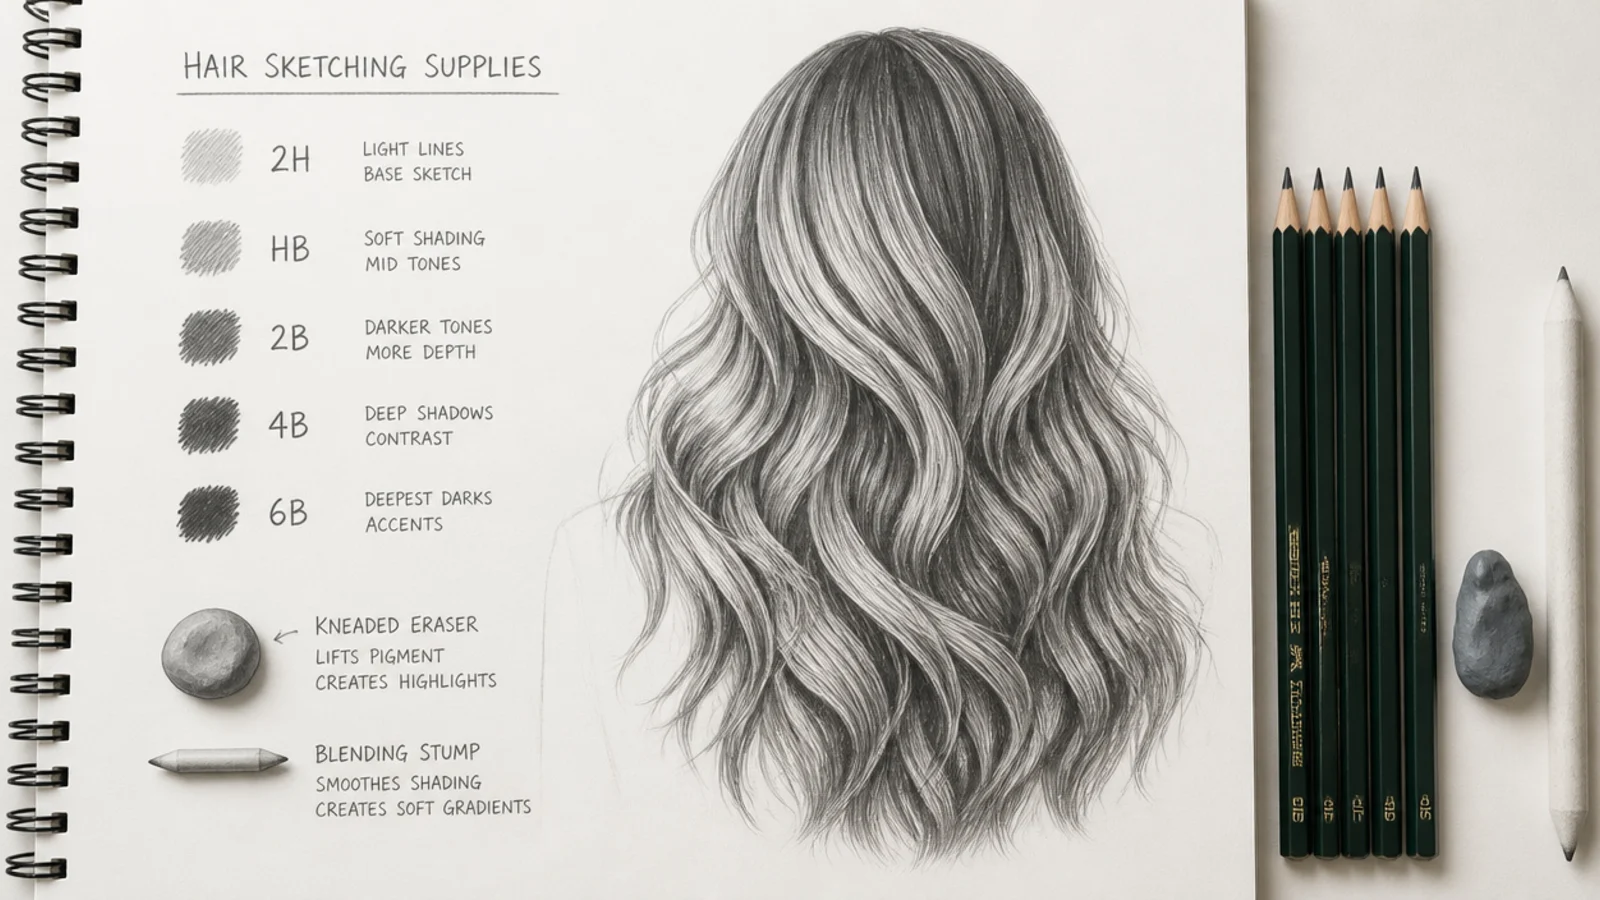
Three grades cover everything. A 2H for construction lines that have to disappear, an HB or 2B for the mid tone, and a 6B for the dark cores. A full set of twelve mostly slows the decision down.
A kneaded eraser lifts, a vinyl eraser removes. Kneaded graphite comes away without abrading the surface, which is how you pull a highlight band out of a shaded mass instead of carefully drawing around it.
Paper tooth decides how fine a strand can be. Smooth hot pressed paper takes a hair thin line; a toothed cartridge surface breaks that same line into dots and forces you to work larger.
A blending stump is for the mid tone only. Smudging the darks kills the contrast between strand groups, and that contrast is the only thing separating hair from felt.
Starting With Shape Before Strands
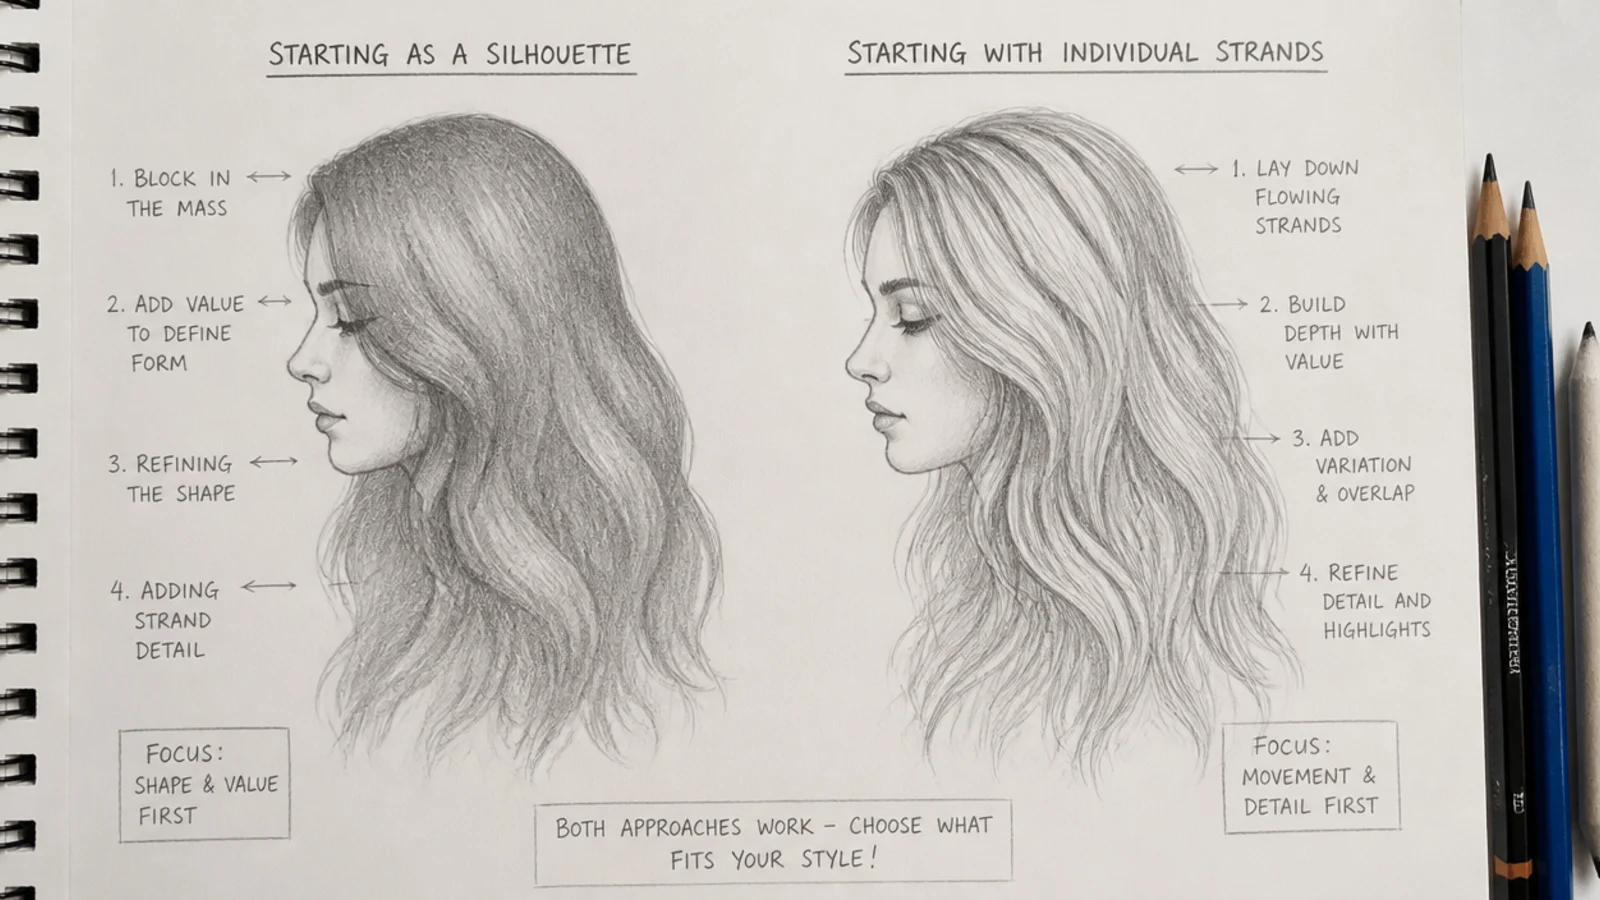
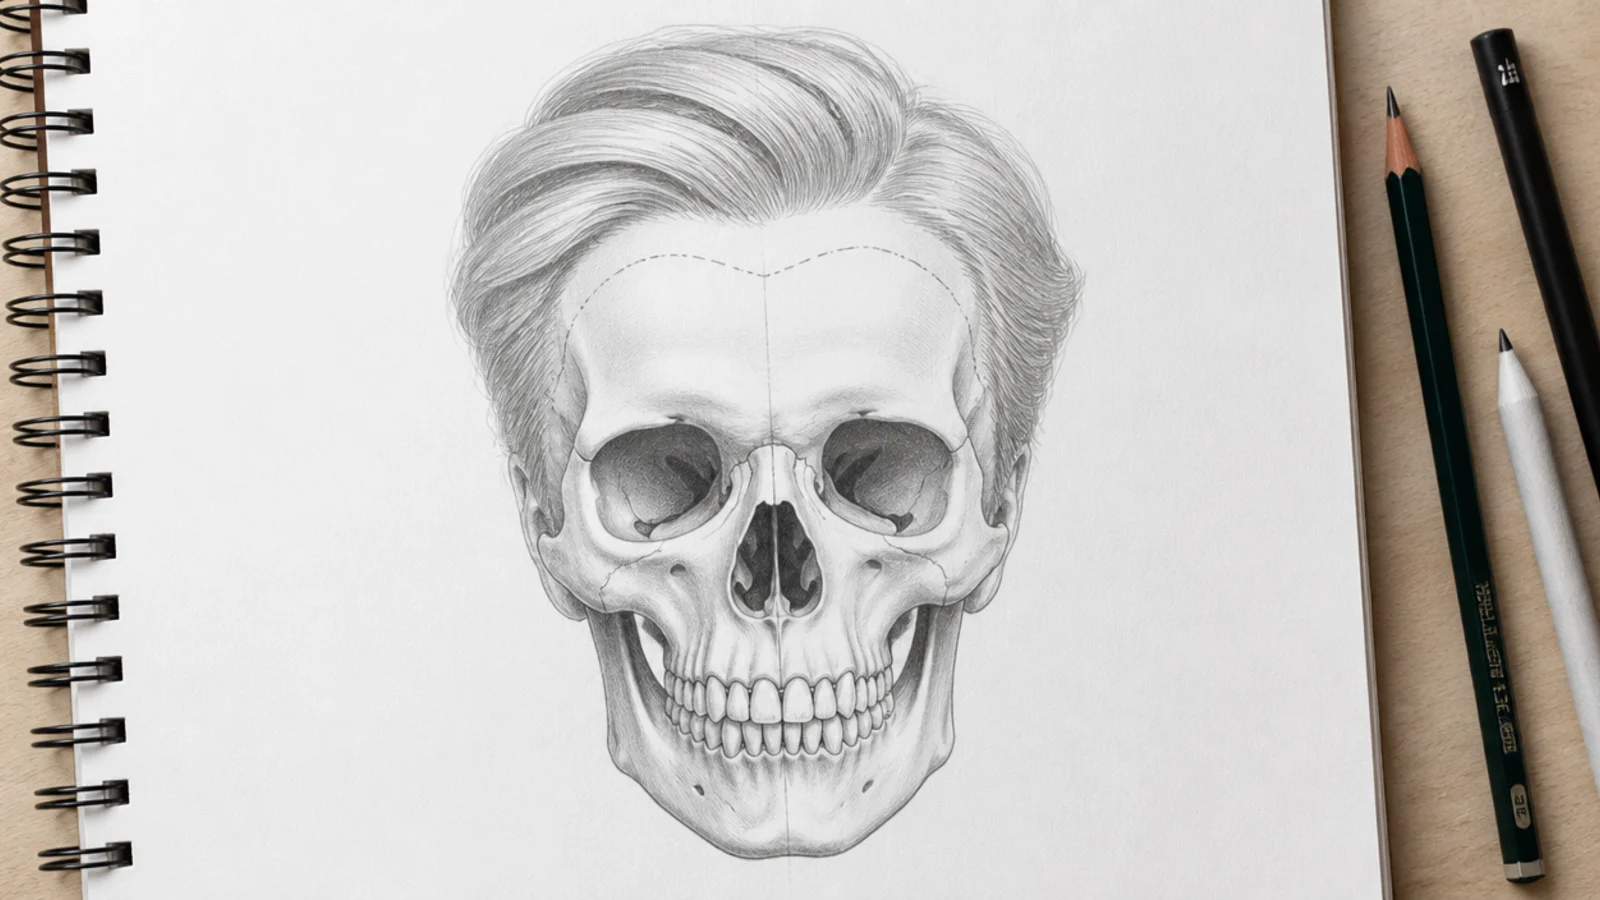
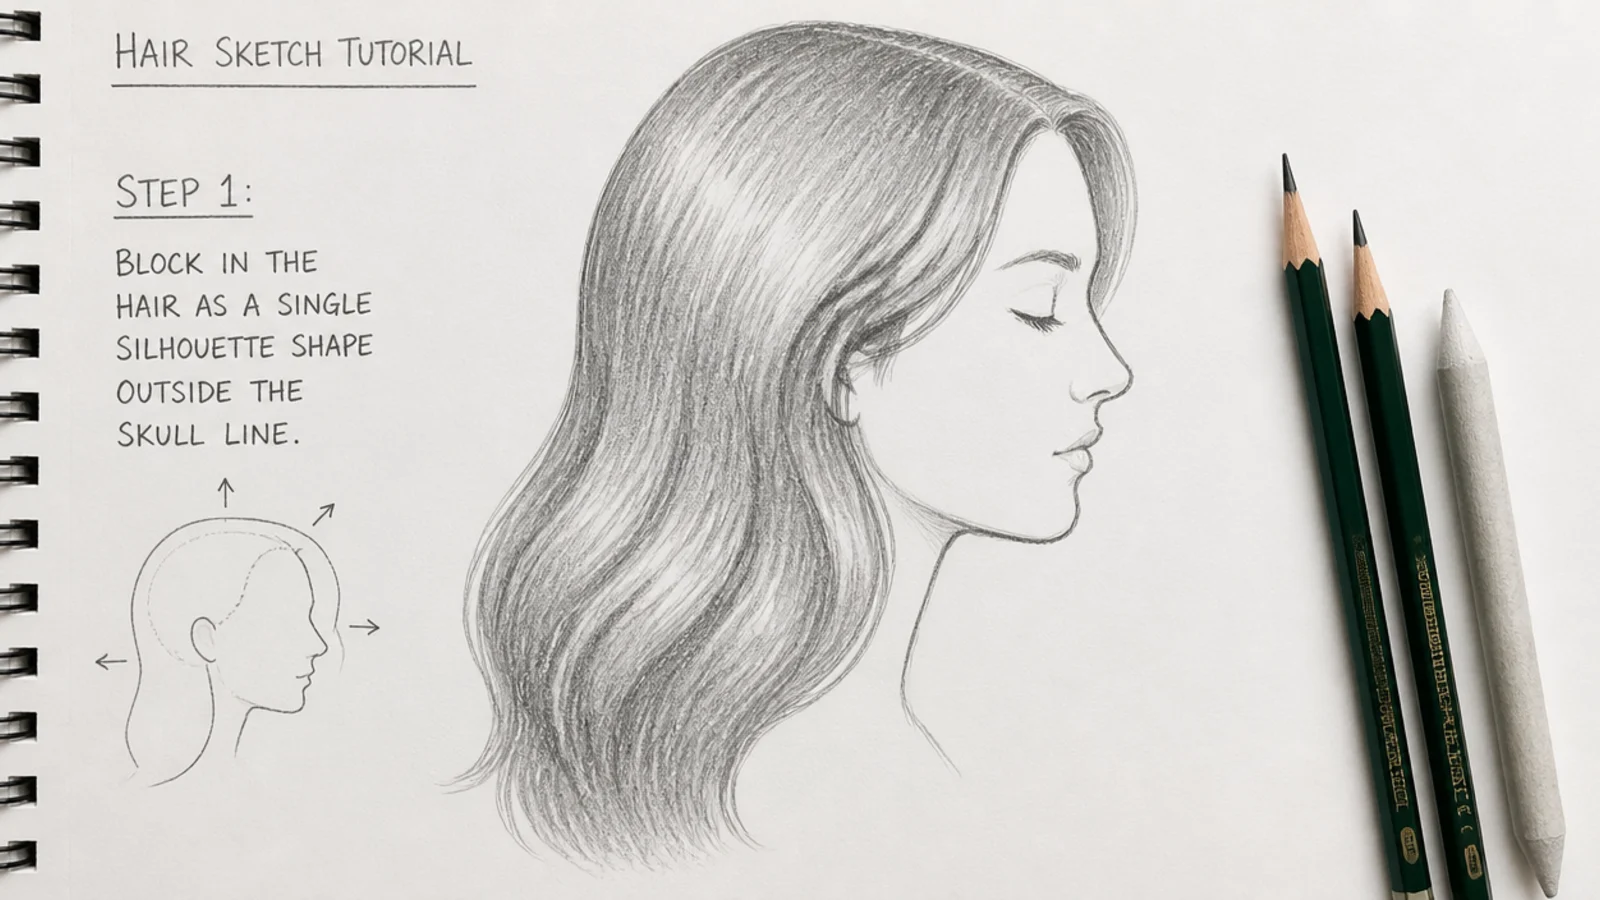
Hair sits outside the skull, not on it. Draw the skull, then draw the hair silhouette a visible distance outside it. Even a close crop lifts the outline, and a long style can sit half a head width proud at the sides.
The silhouette carries the style. Blunt bob, shag, afro, ponytail — each is recognisable as a solid black shape at thumbnail size, which is the test of whether it is right before any detail goes in.
Construction lines stay light enough to lift. A 2H at low pressure leaves a groove free line a kneaded eraser takes off completely. A 2B construction line is still faintly visible under six layers of shading.
Nothing gets drawn twice. If the silhouette is wrong, fix the silhouette. Adding strands over a bad outline only makes the bad outline more expensive to change.
Shading for Volume and Depth
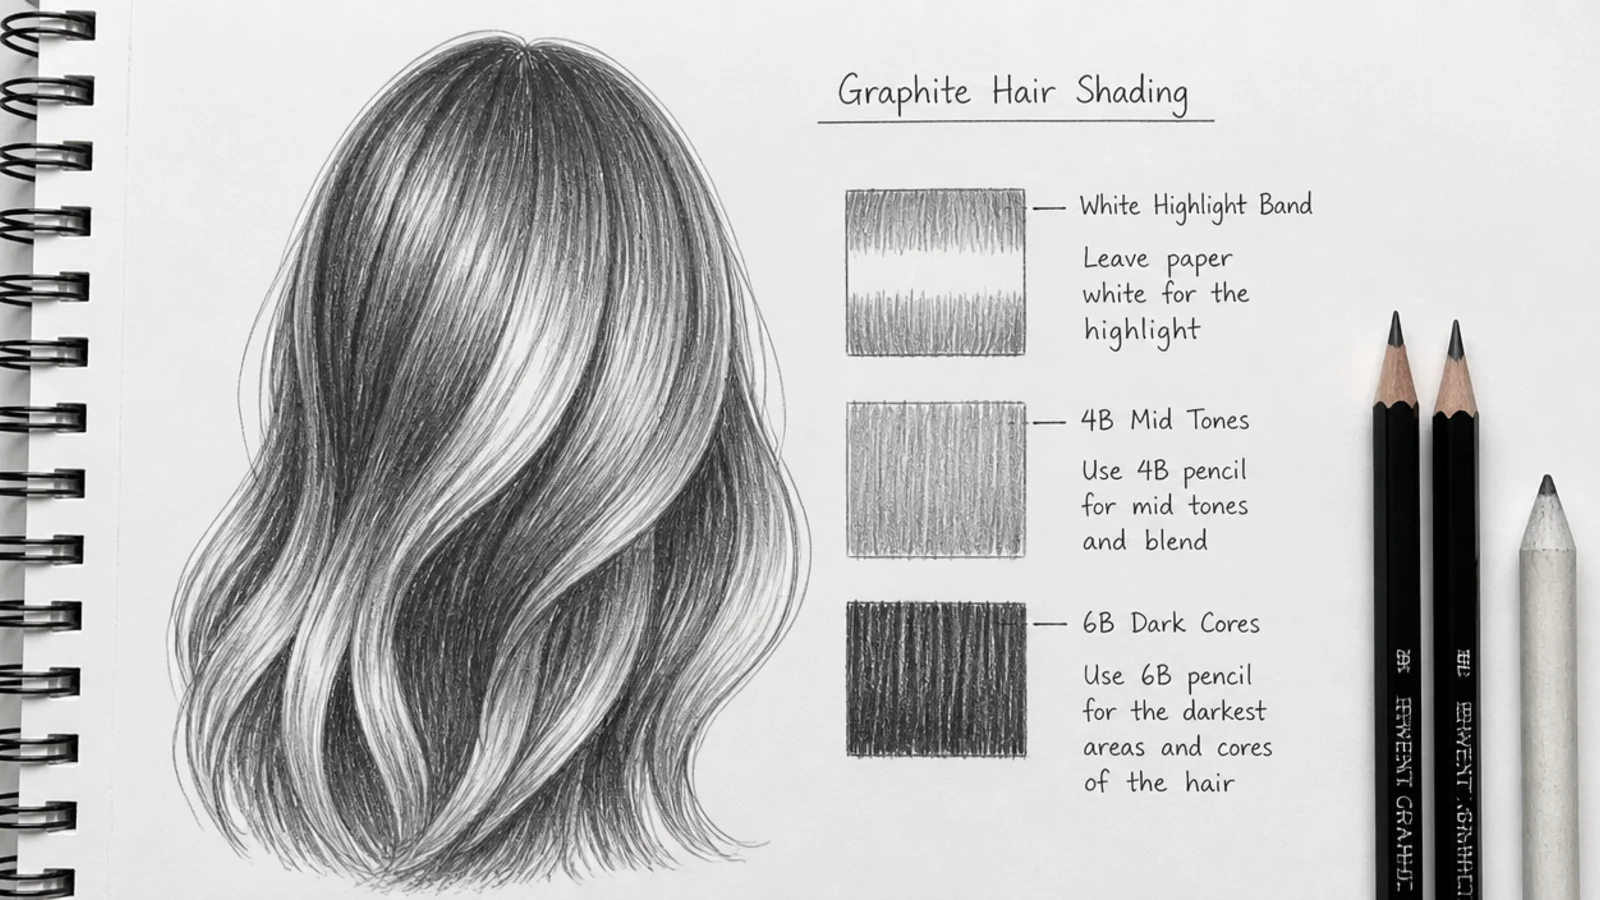
Three values, then stop. Light, mid, dark. Hair reads from across the room on those three alone, and a fourth and fifth add rendering time without adding legibility.
The highlight is a band, not a line. It runs across the direction of the strands and follows the curve of the skull, which is what tells the eye the mass is round rather than flat.
The darkest values go between groups, not on them. The deep line where two strand groups separate is the most convincing mark in a hair drawing, because it implies a depth the paper does not have.
Leave the paper alone where the light is. Untouched white is the brightest value you own, and once it has been shaded no eraser fully returns it.
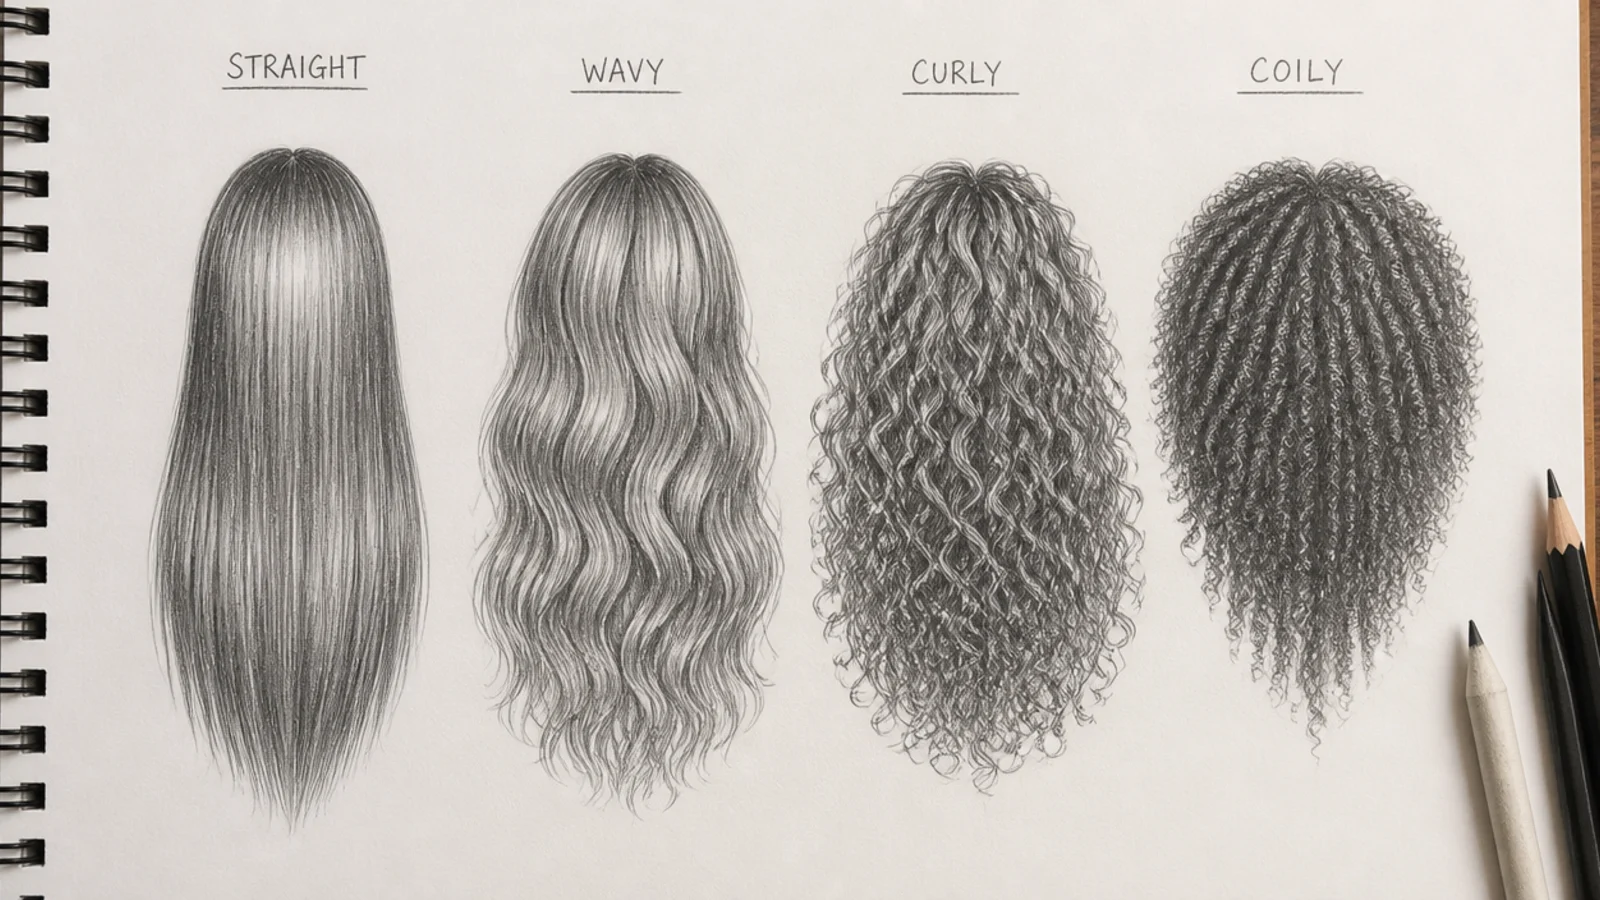
Straight Wavy Curly and Coily
Straight hair shows every error. One direction, one long stroke, nowhere to hide a wobble. It is the hardest of the four to make look effortless.
Wavy hair alternates its faces. Each bend turns a new surface toward the light, so value changes at every turn instead of running evenly down the length.
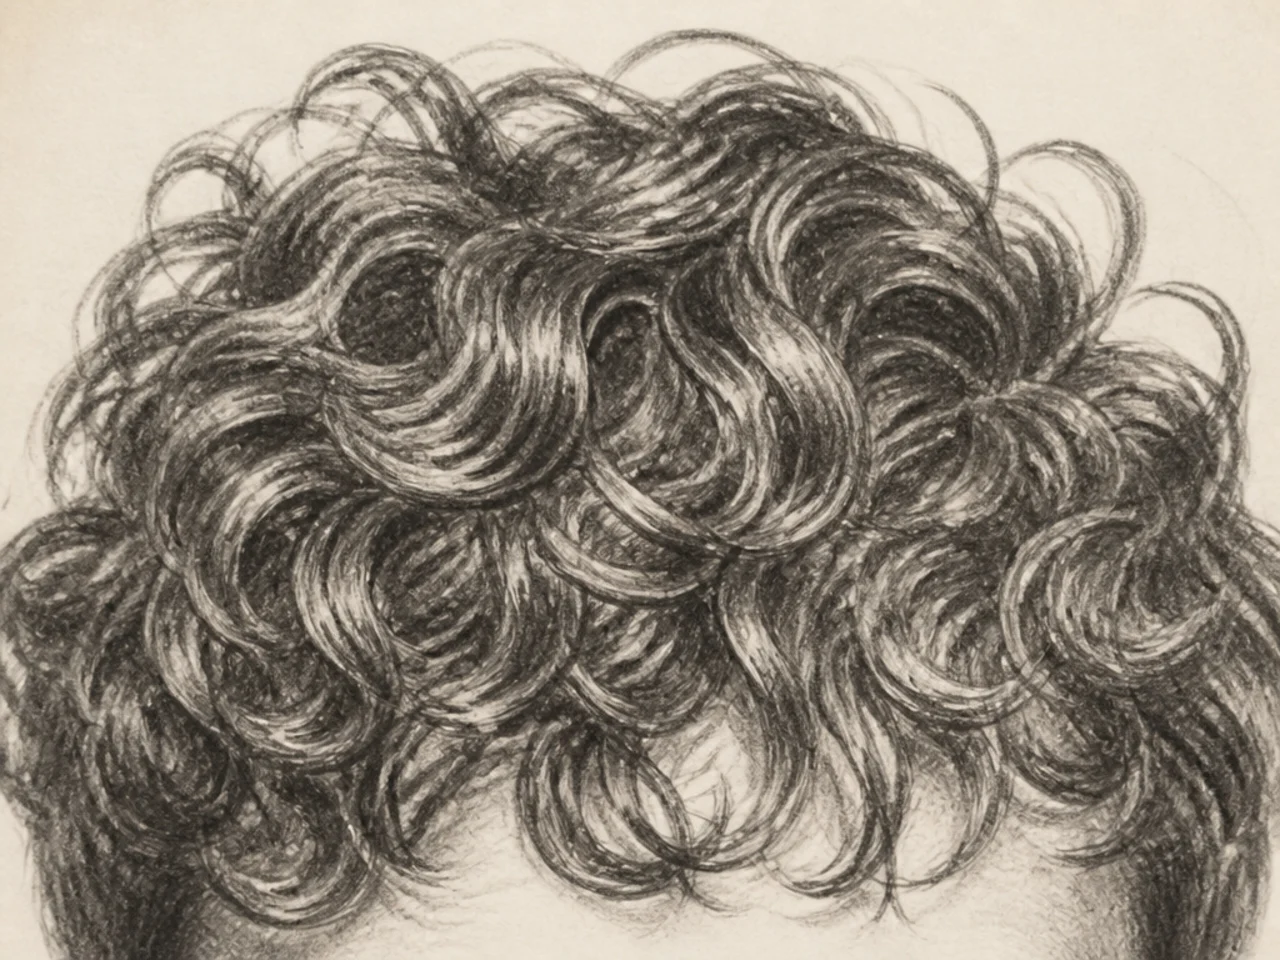
Curly hair is drawn as ribbons. A curl is a strip wrapping a cylinder, showing its outer face and then its inner one, and the inner face is always the darker of the two.
Coily hair is shaded as a mass. The texture lives at the silhouette edge as a fine irregular zigzag while the interior is treated as a sphere with a single highlight.
Using References
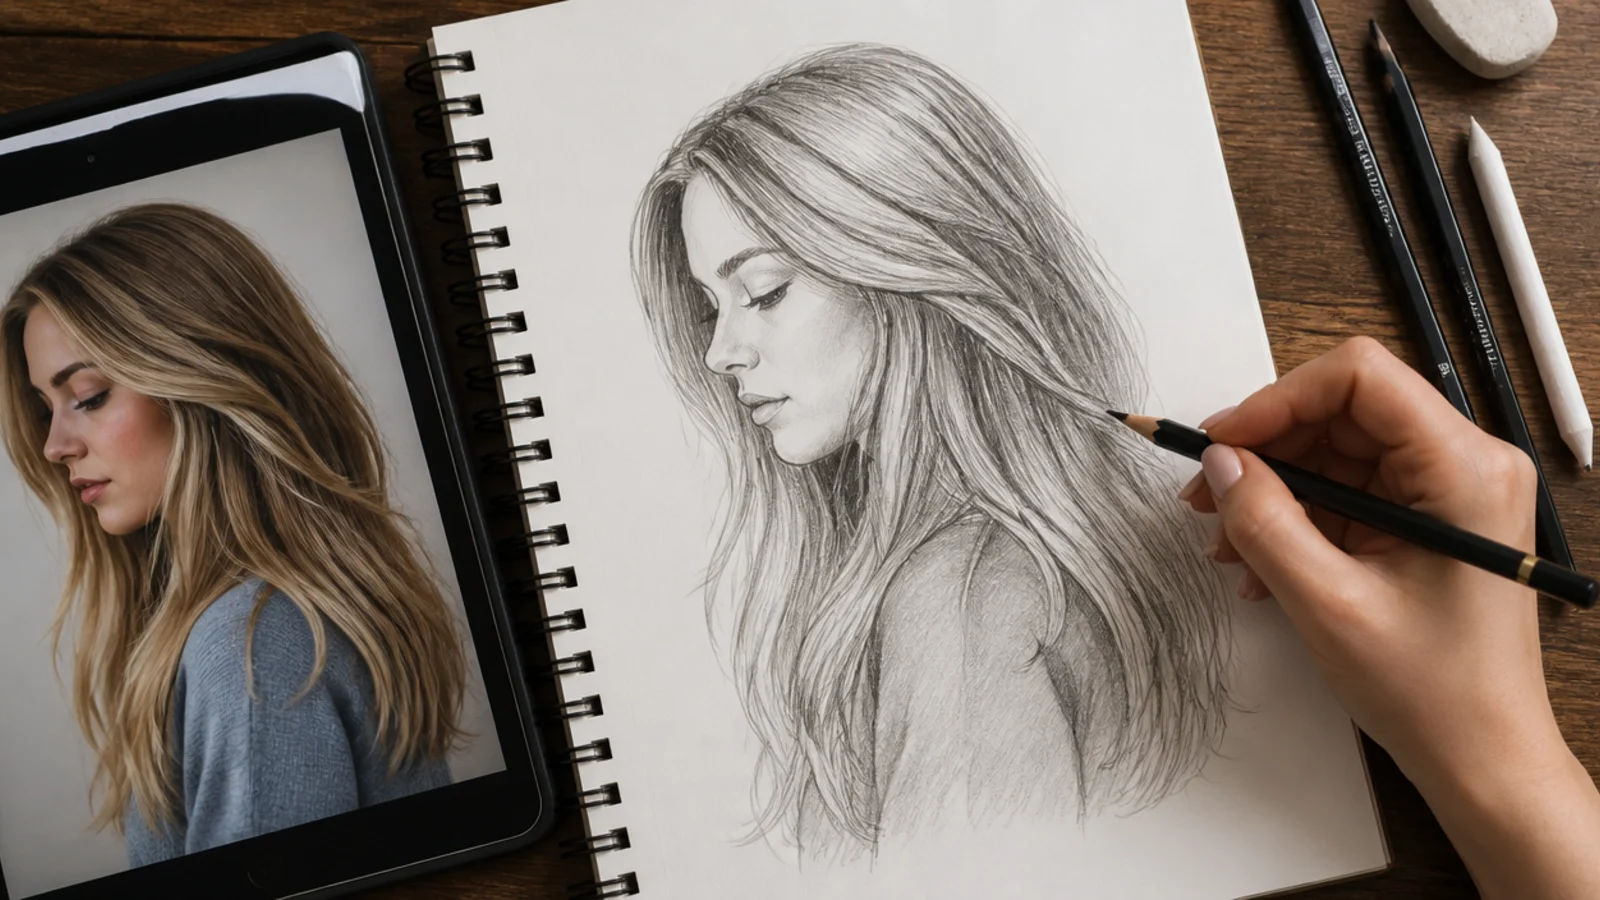
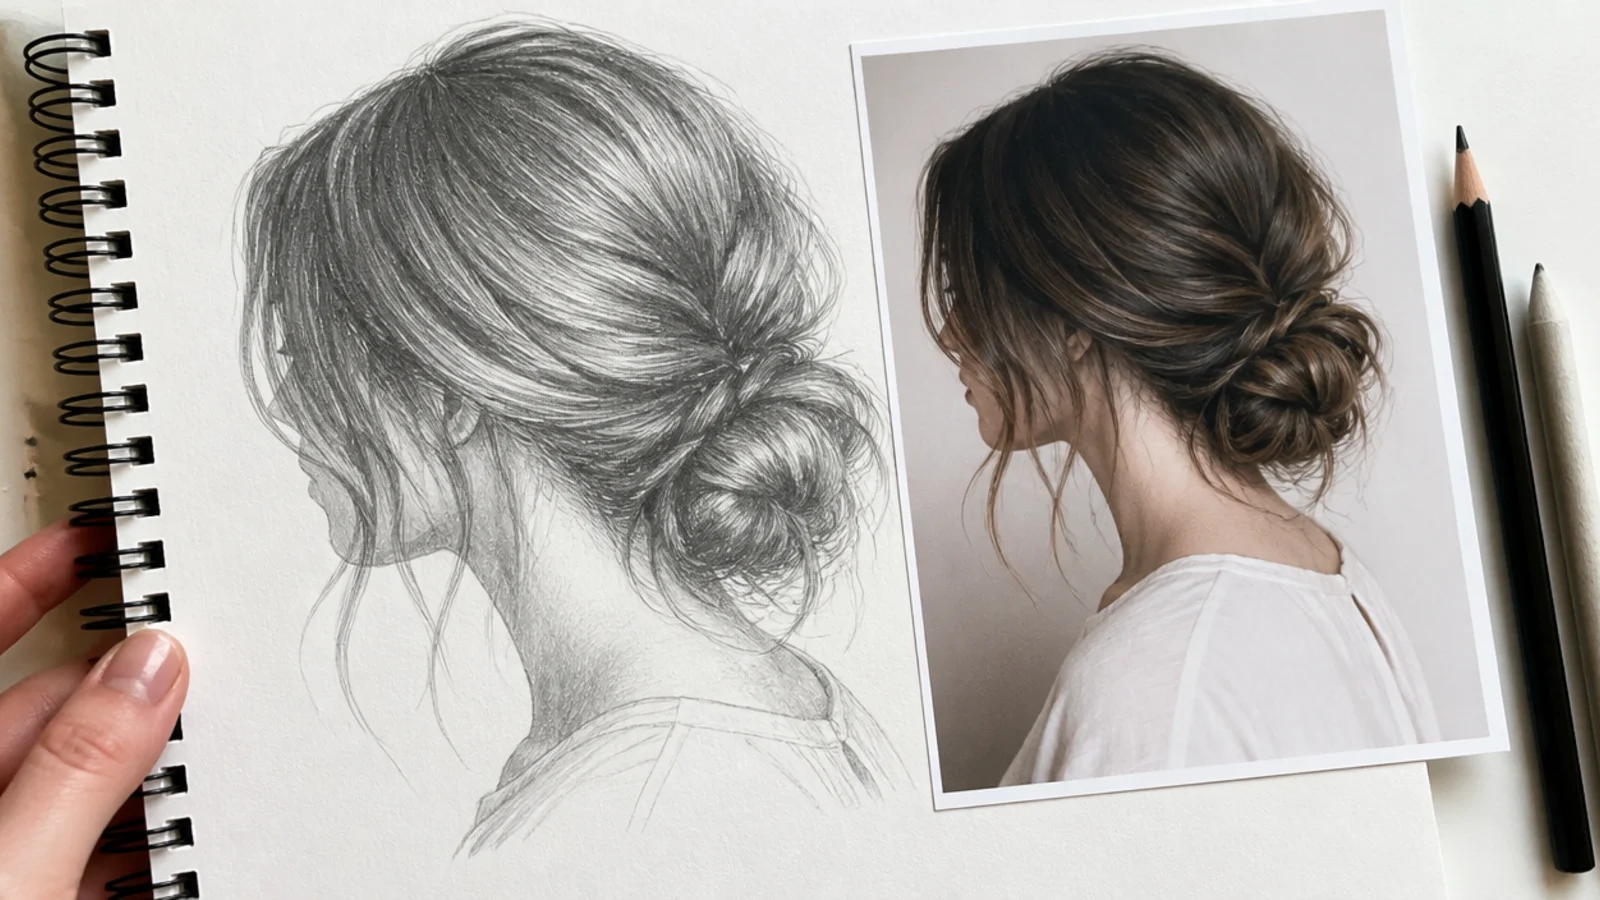
Work from a photograph with one clear light. Mixed lighting gives you two highlight bands running in different directions, and copying both produces a drawing that reads as an error.
Squint at the reference before you start. Squinting collapses the photograph to three values, which is exactly the structure you are about to draw.
Match the light direction, not the strand count. Where the highlight sits is what makes a drawing resemble its reference. Nobody has ever checked the strands.
Use several references for one drawing. One for the silhouette, one for the texture, one for the lighting. Copying a single photograph teaches you that photograph and nothing else.
Common Mistakes and Fixes
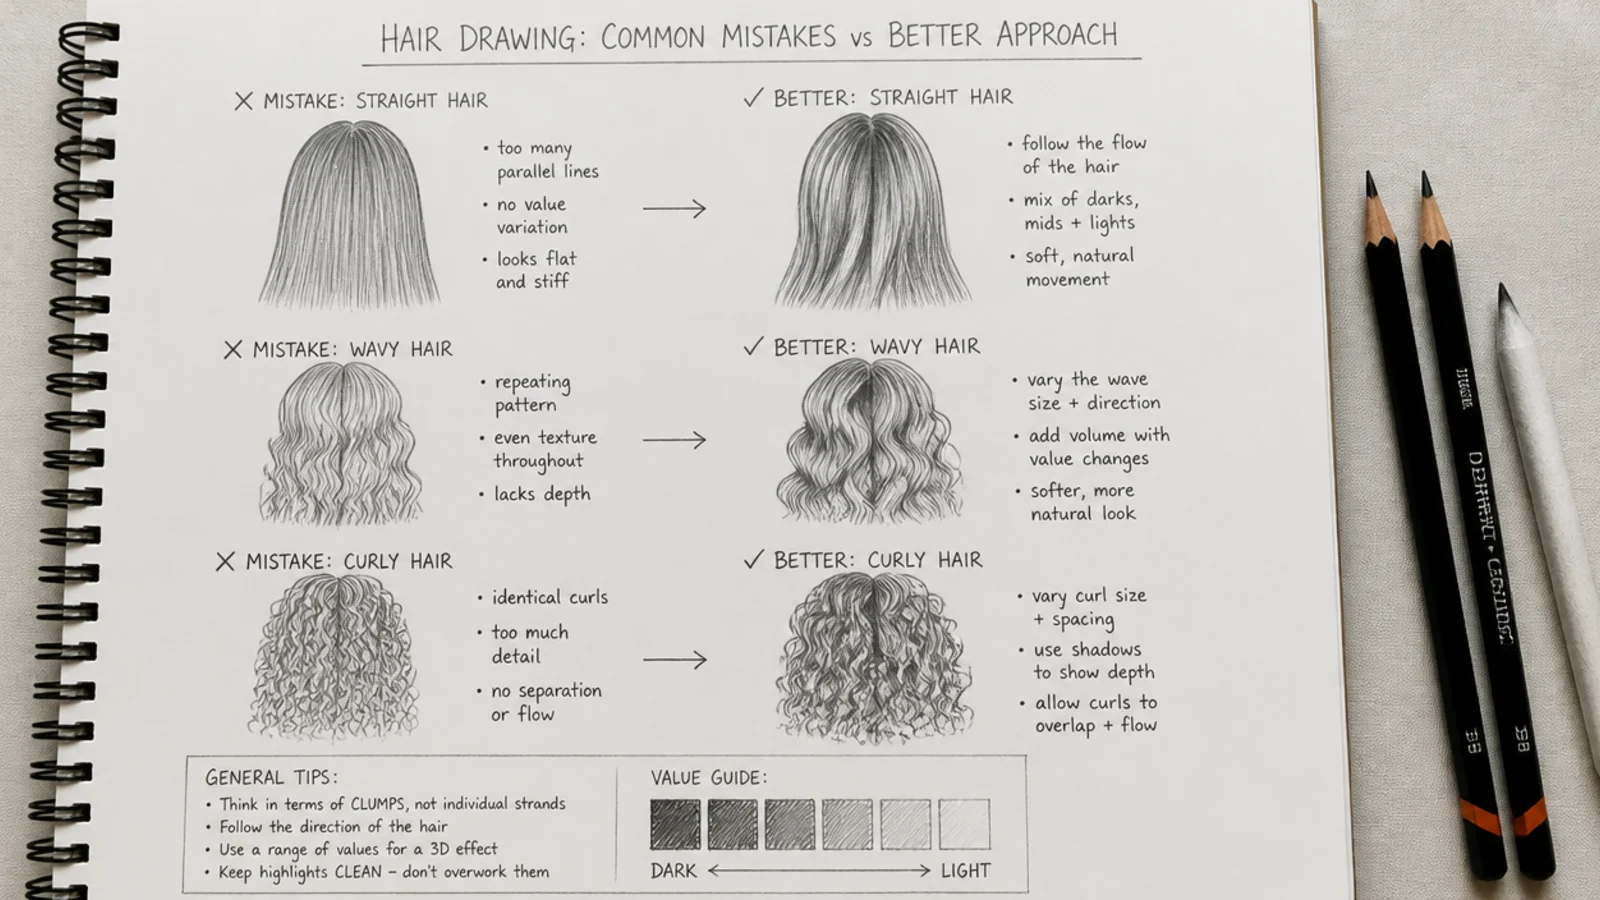
Parallel strands. Real hair splits and converges constantly. Vary the gaps and let lines meet each other.
Hair glued to the skull. Push the silhouette outward. Hair has volume before it has strands.
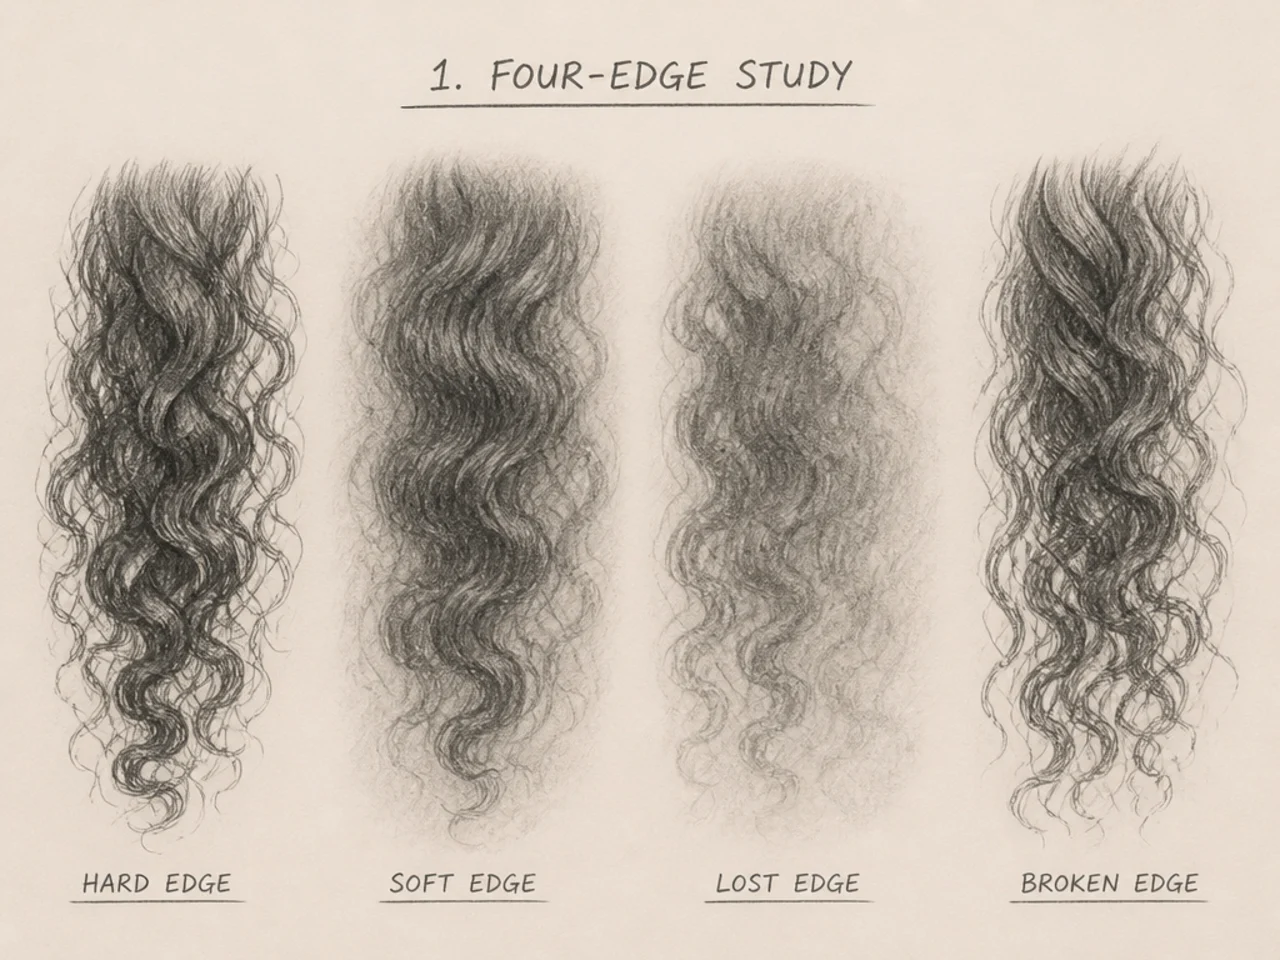
A hard outline around the mass. Break the edge with flicks, because an unbroken contour reads as a helmet at any level of interior detail.
Every strand drawn. Draw groups first, then a handful of individual strands where the light catches the edge.
Even value everywhere. No darks between the groups means no depth, and the whole head flattens back into a shape.
The 15 Hair Sketch Exercises
1. Straight Long Front View
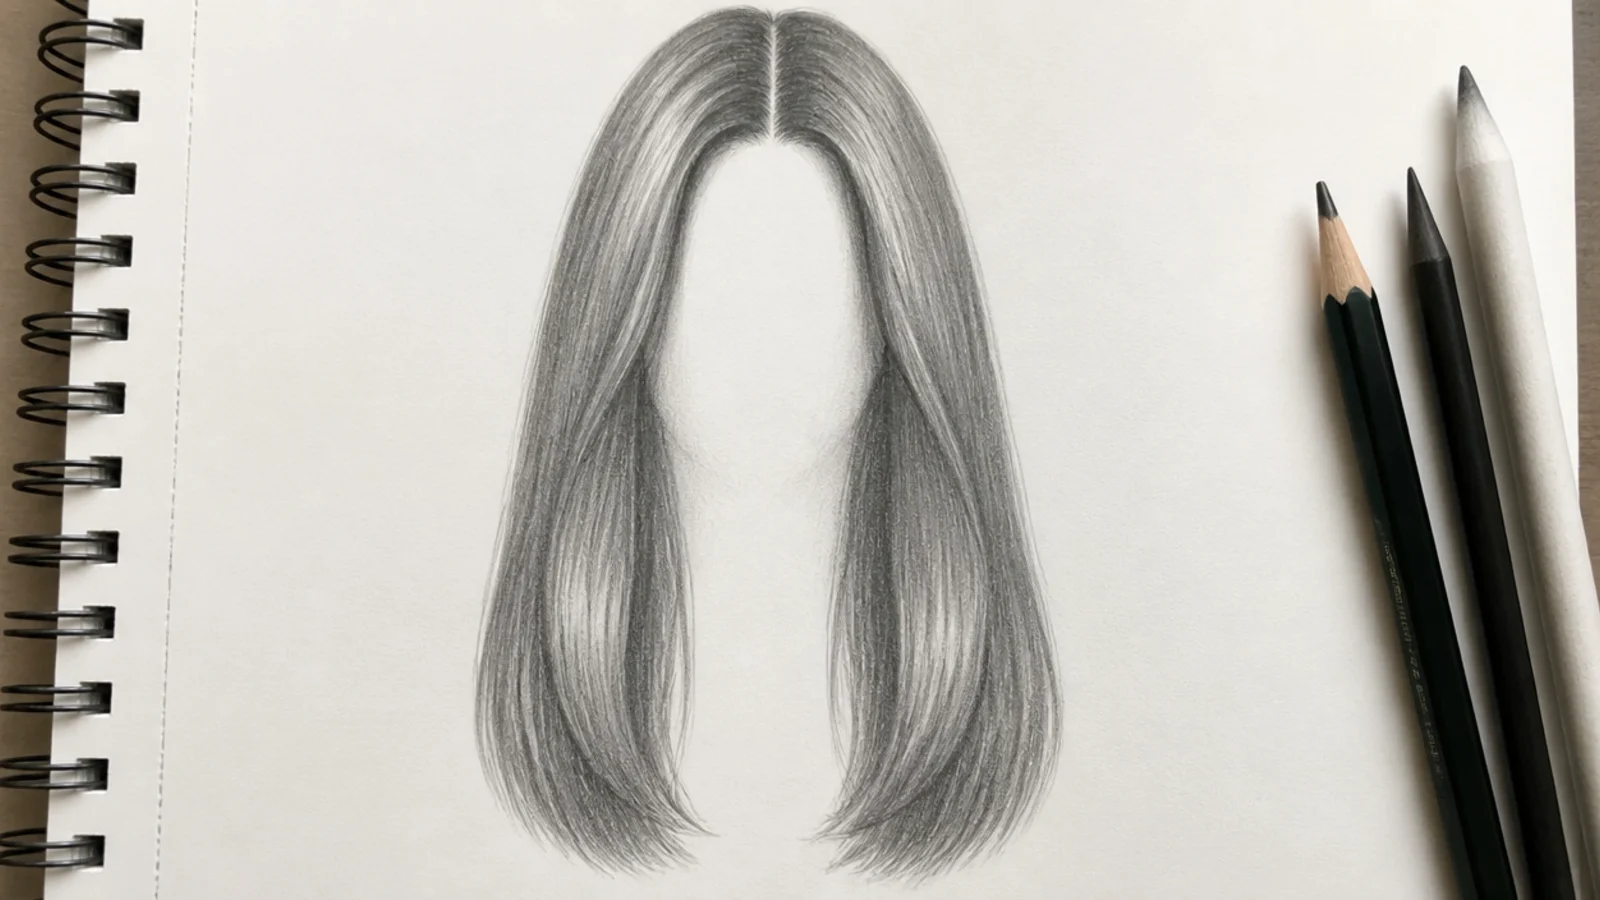
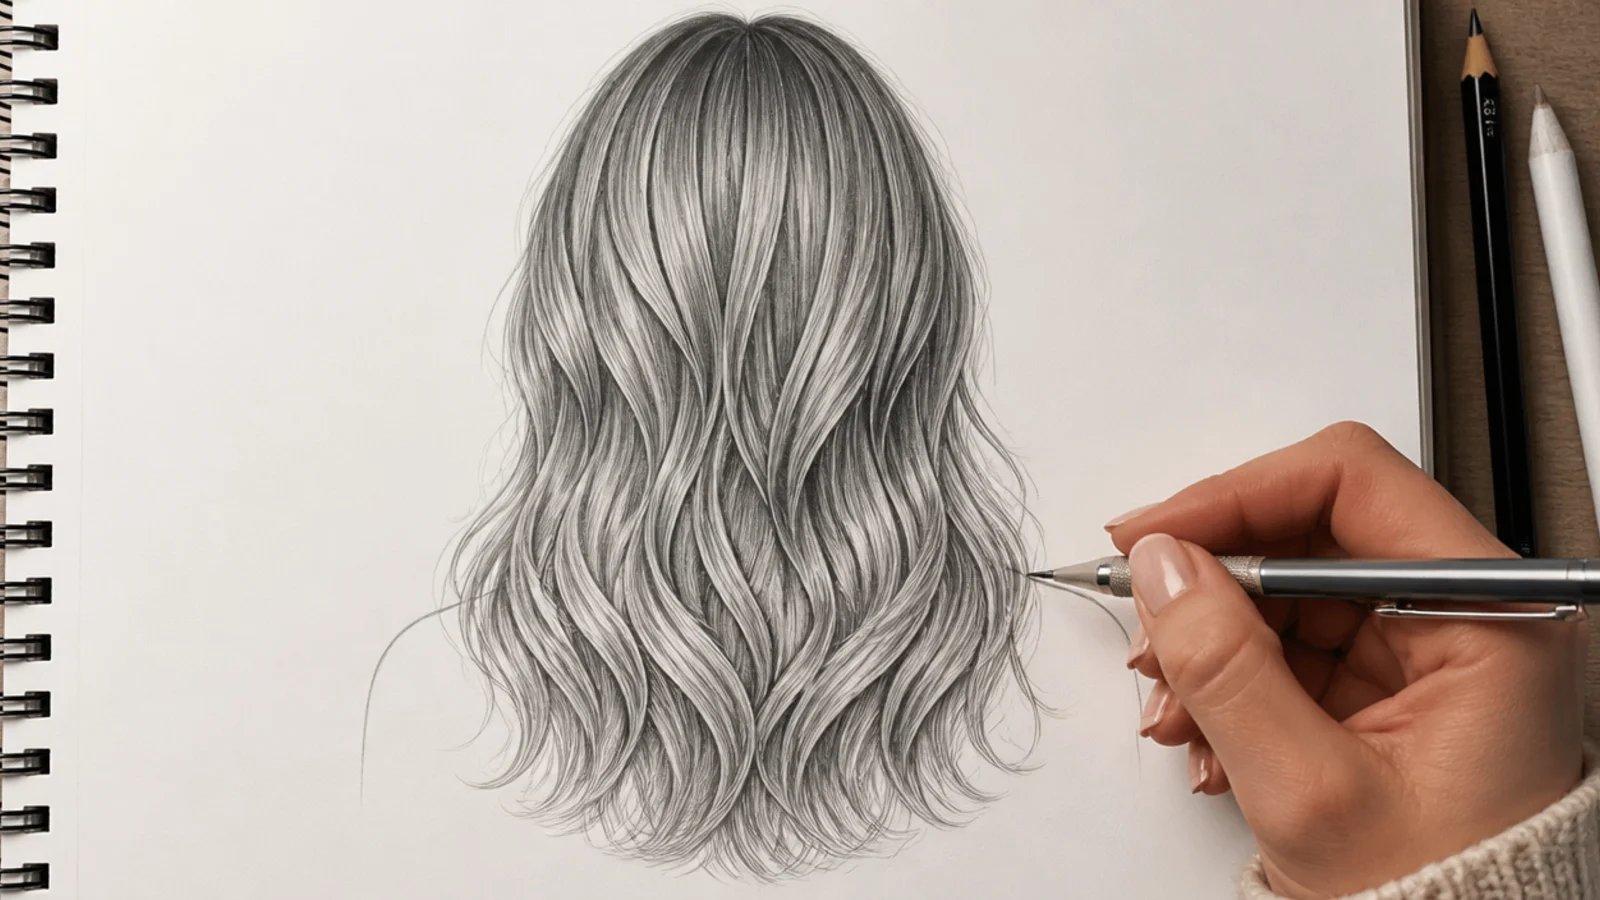
Straight hair leaves nowhere to hide, because every strand runs the same way and any wobble in that direction is read as a wobble rather than as texture. Keep the strokes long and unbroken from crown to end, lifting pressure at the finish so each one tapers instead of stopping dead.
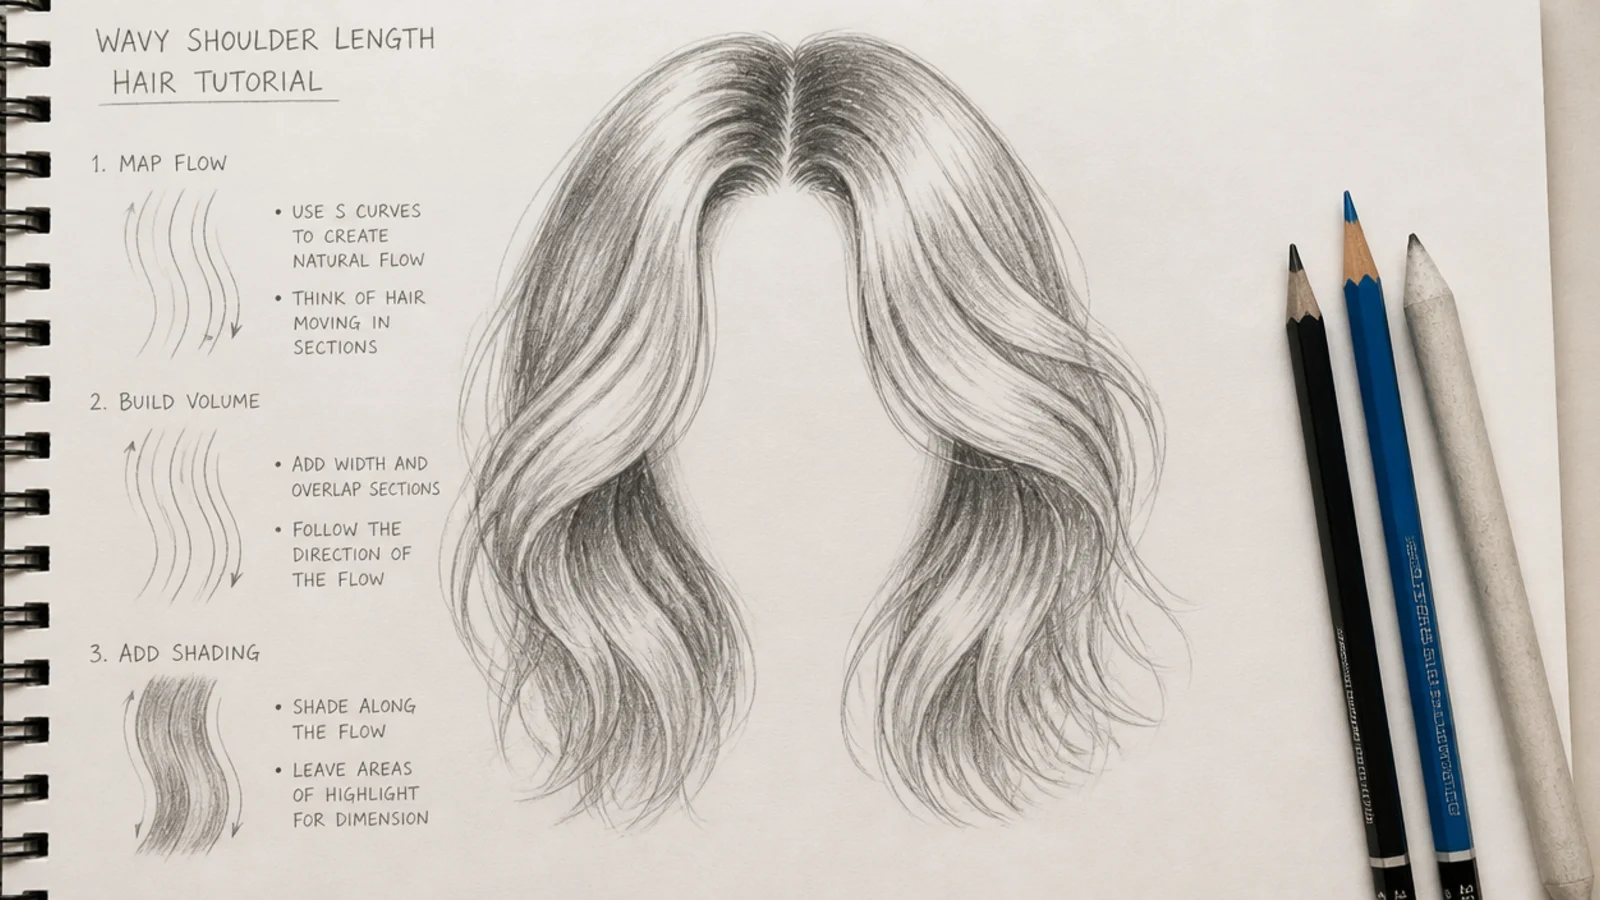
2. Wavy Shoulder Length
A wave is an S laid on its side, and the shading has to change at every bend because each turn presents a different face to the light. Shade the outer curve lighter and the inner curve darker, and the hair reads as a surface turning rather than as a line drawn twice.
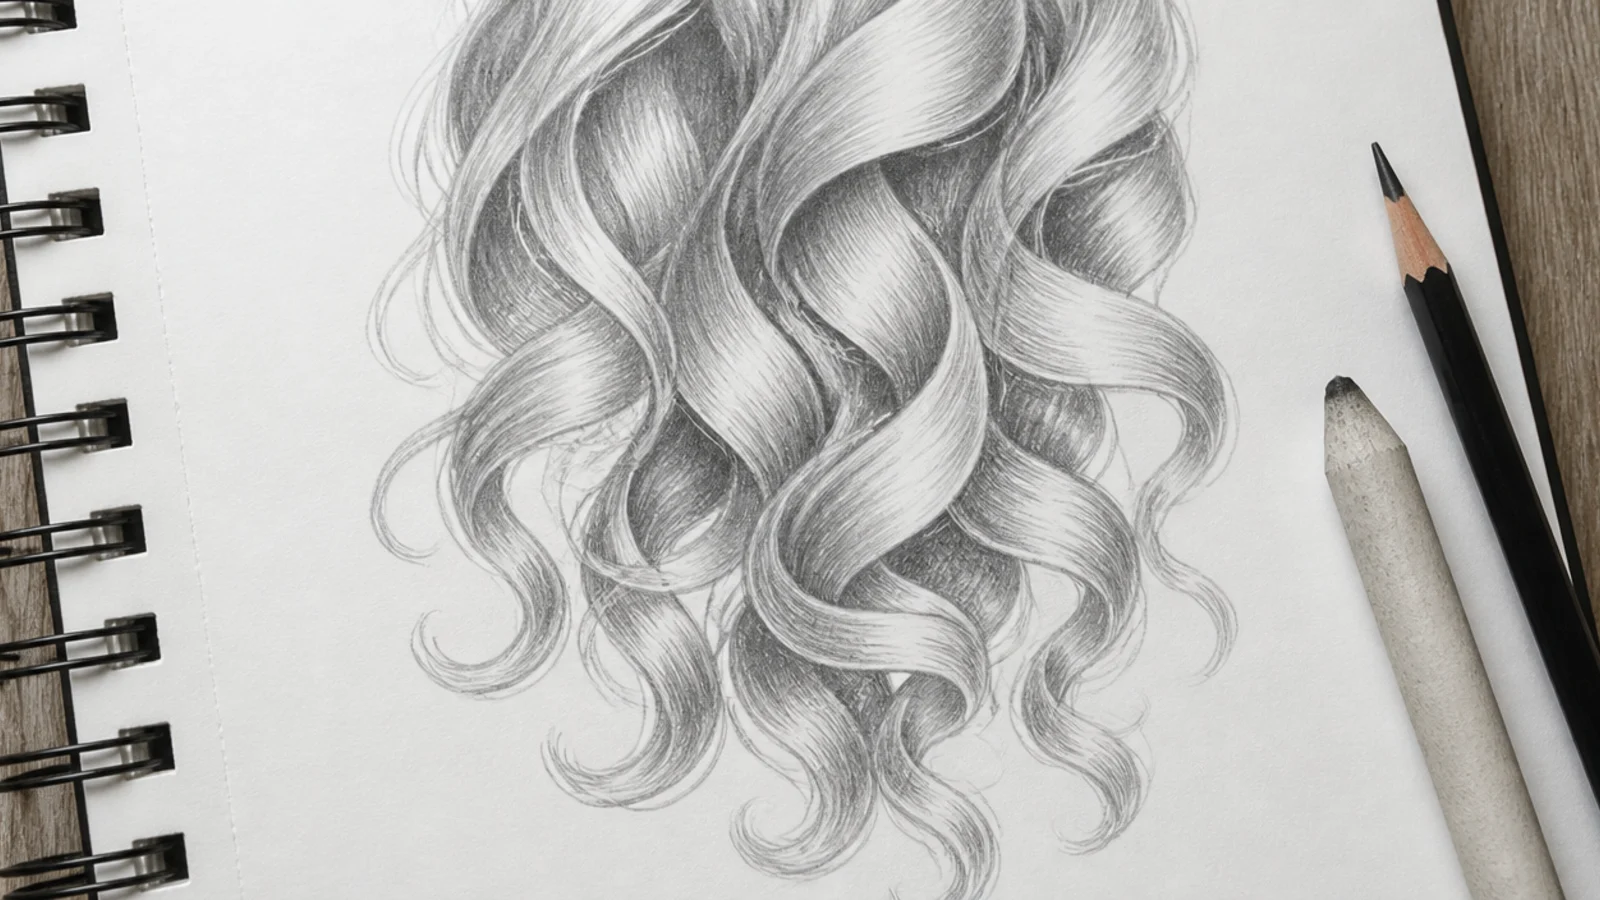
3. Curly Ribbon Method
Draw each curl as a ribbon wrapping an invisible cylinder rather than as a coiled line, so you can see which face turns toward you and which turns away. Give the face turning away the darkest value, and that alternation is what makes a curl read as three dimensional instead of as a spring.
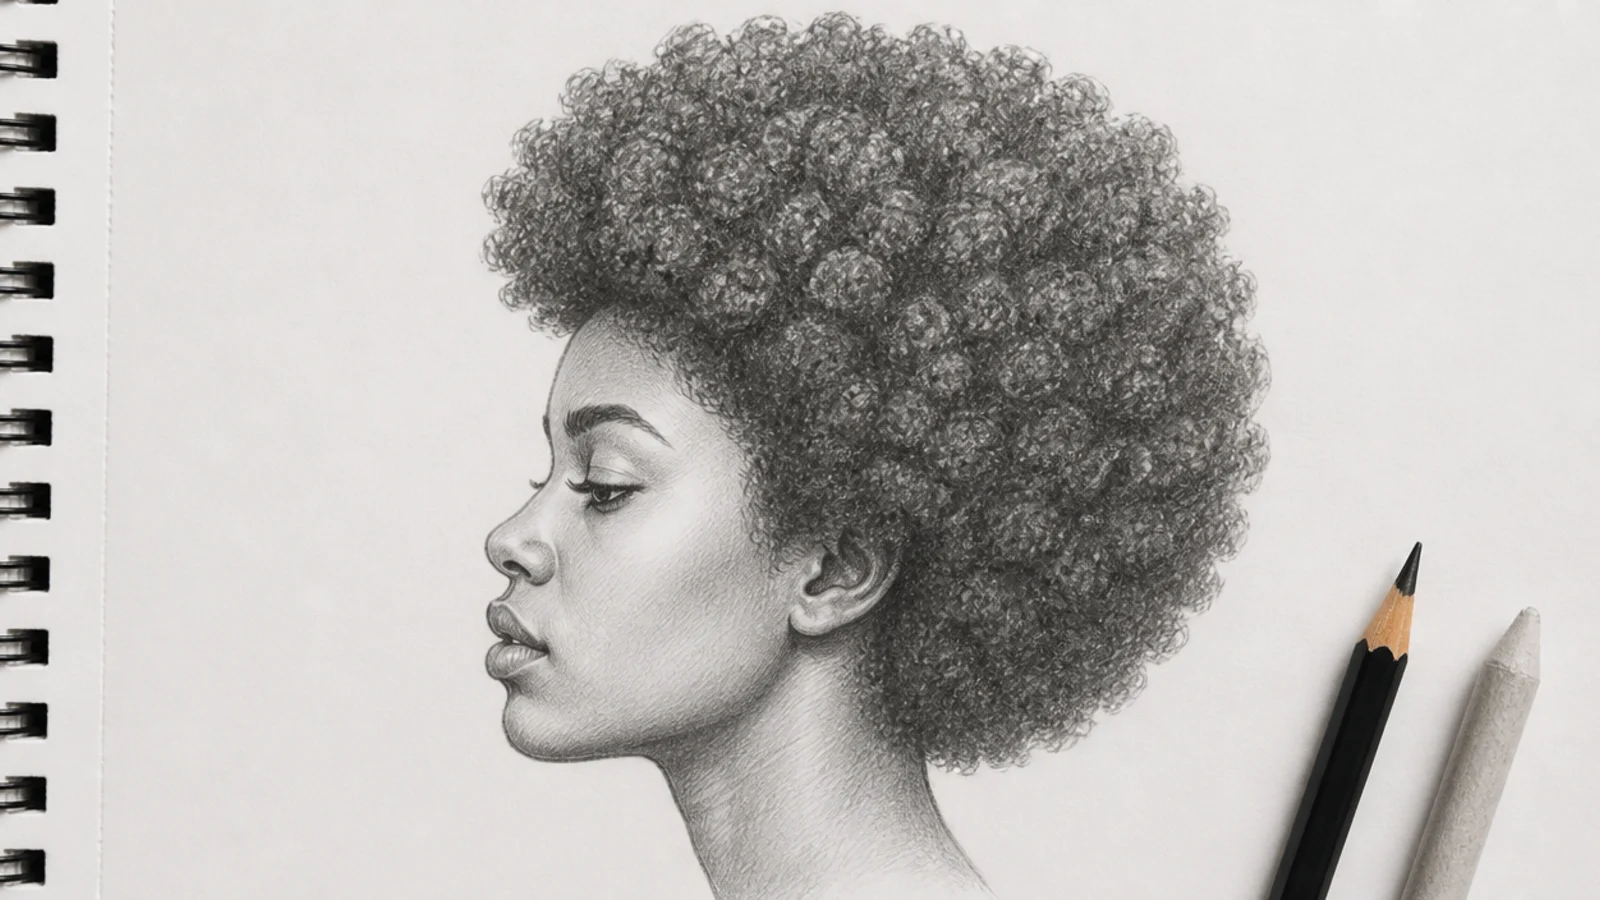
4. Coily 4C Afro
Coils are far too small to draw individually at portrait scale, so the shape gets shaded as a sphere and only the silhouette edge carries the texture. Break that edge with a fine irregular zigzag, leave the interior as soft value, and the whole thing reads correctly from a foot away.
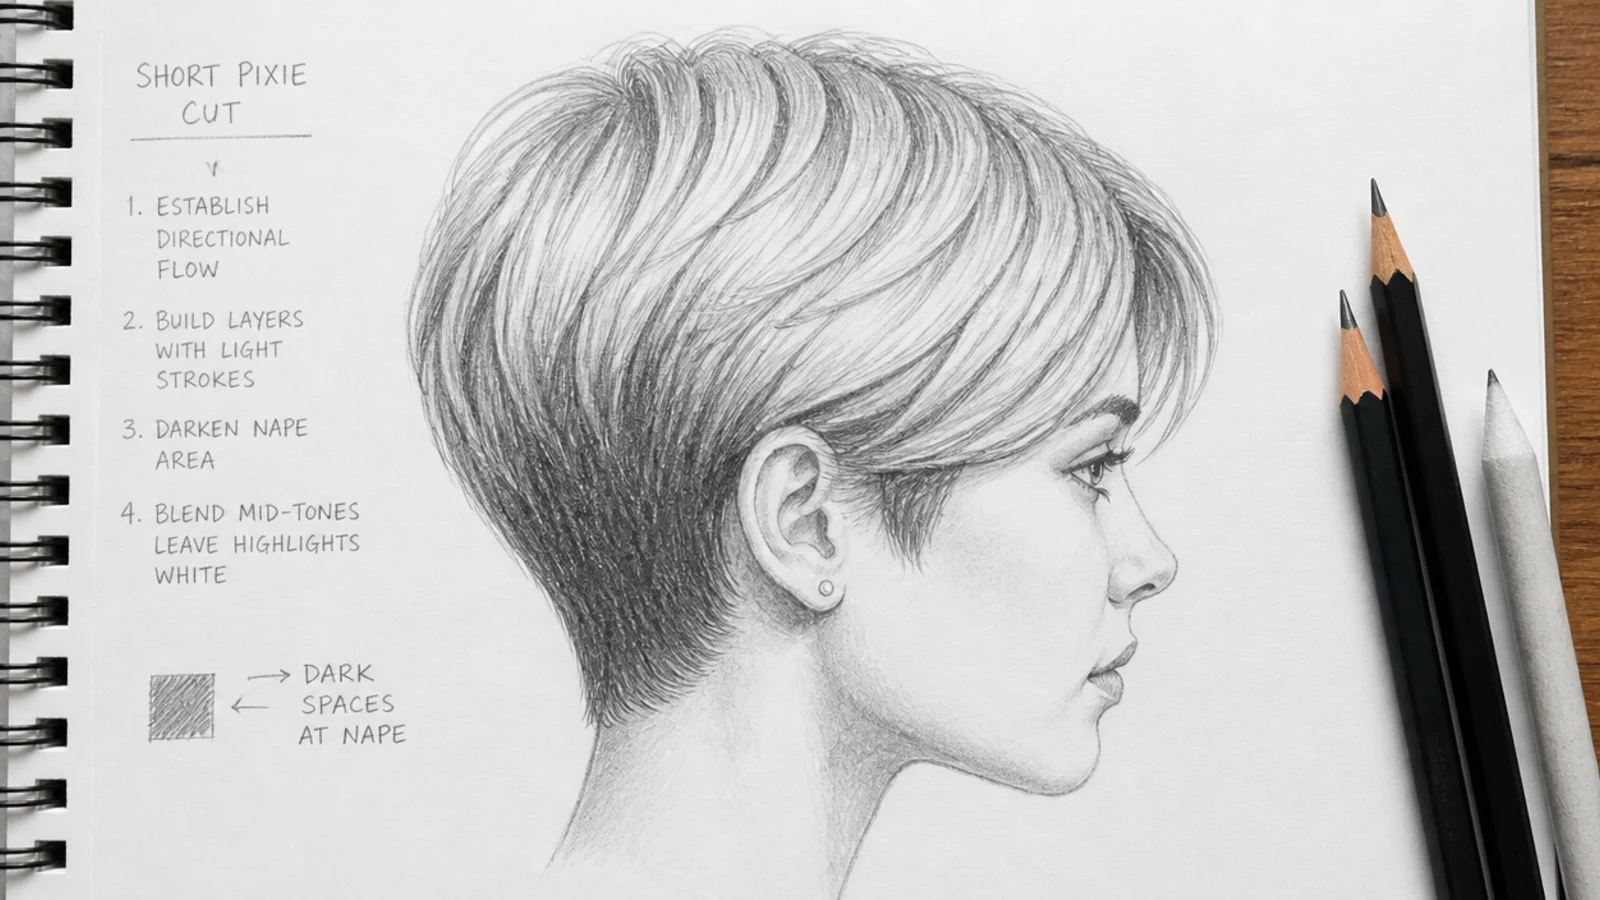
5. Short Hair Side View
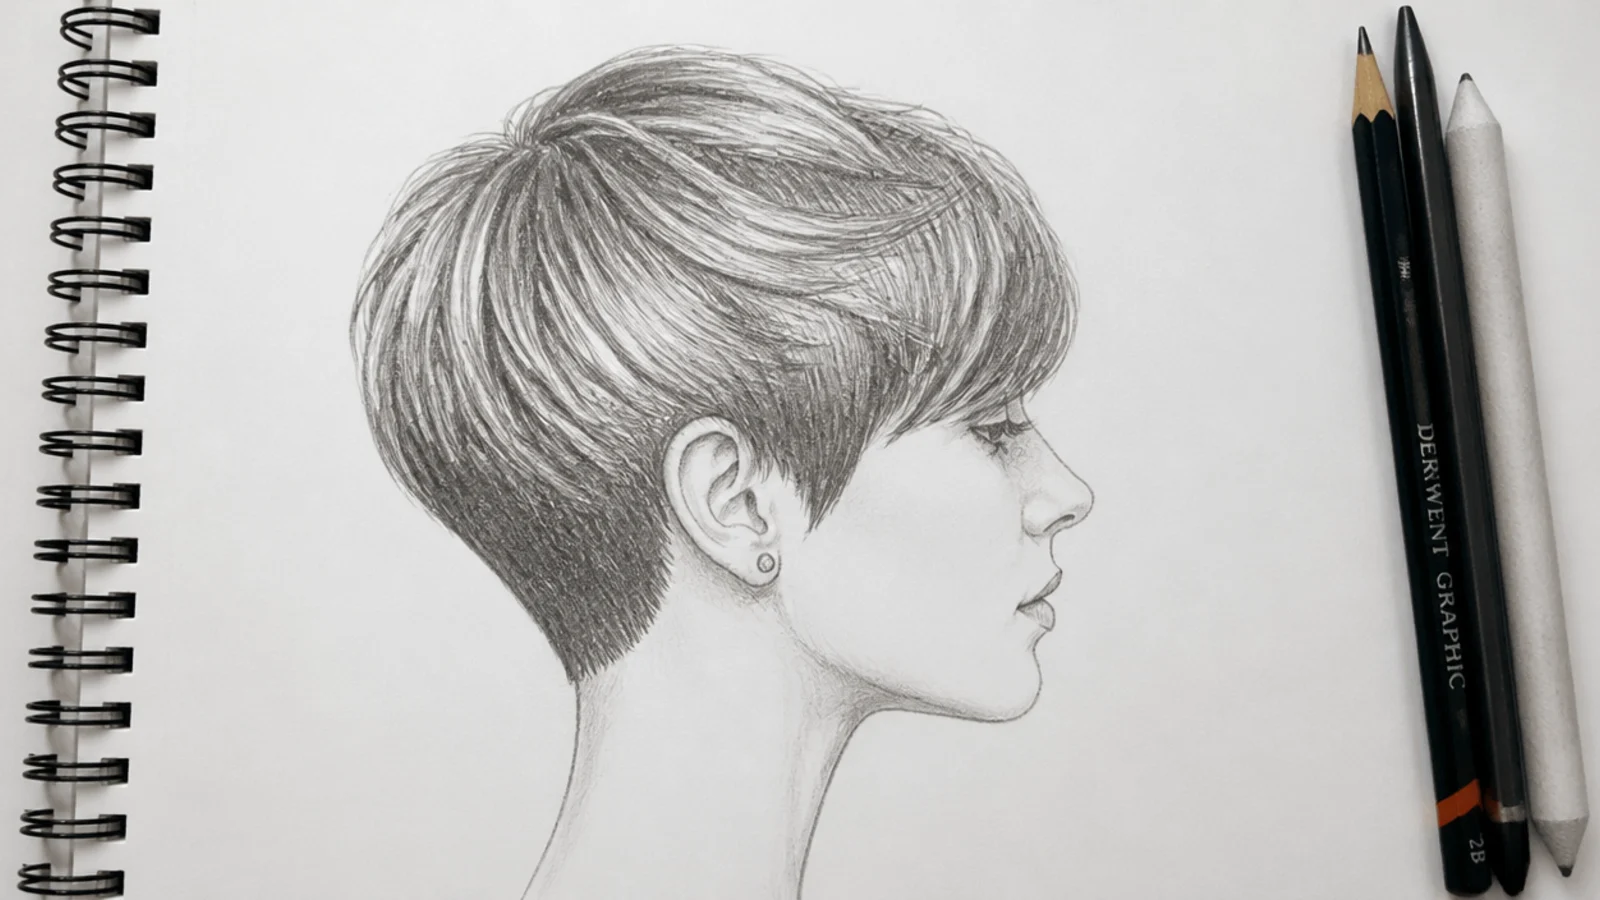
Short hair follows the skull closely, so this is really an exercise in skull shape — the temple flattens, the parietal ridge turns the corner, and the occipital bone bulges at the back. Get those three planes right and almost any short cut will sit on them convincingly.
6. Boys Textured Crop
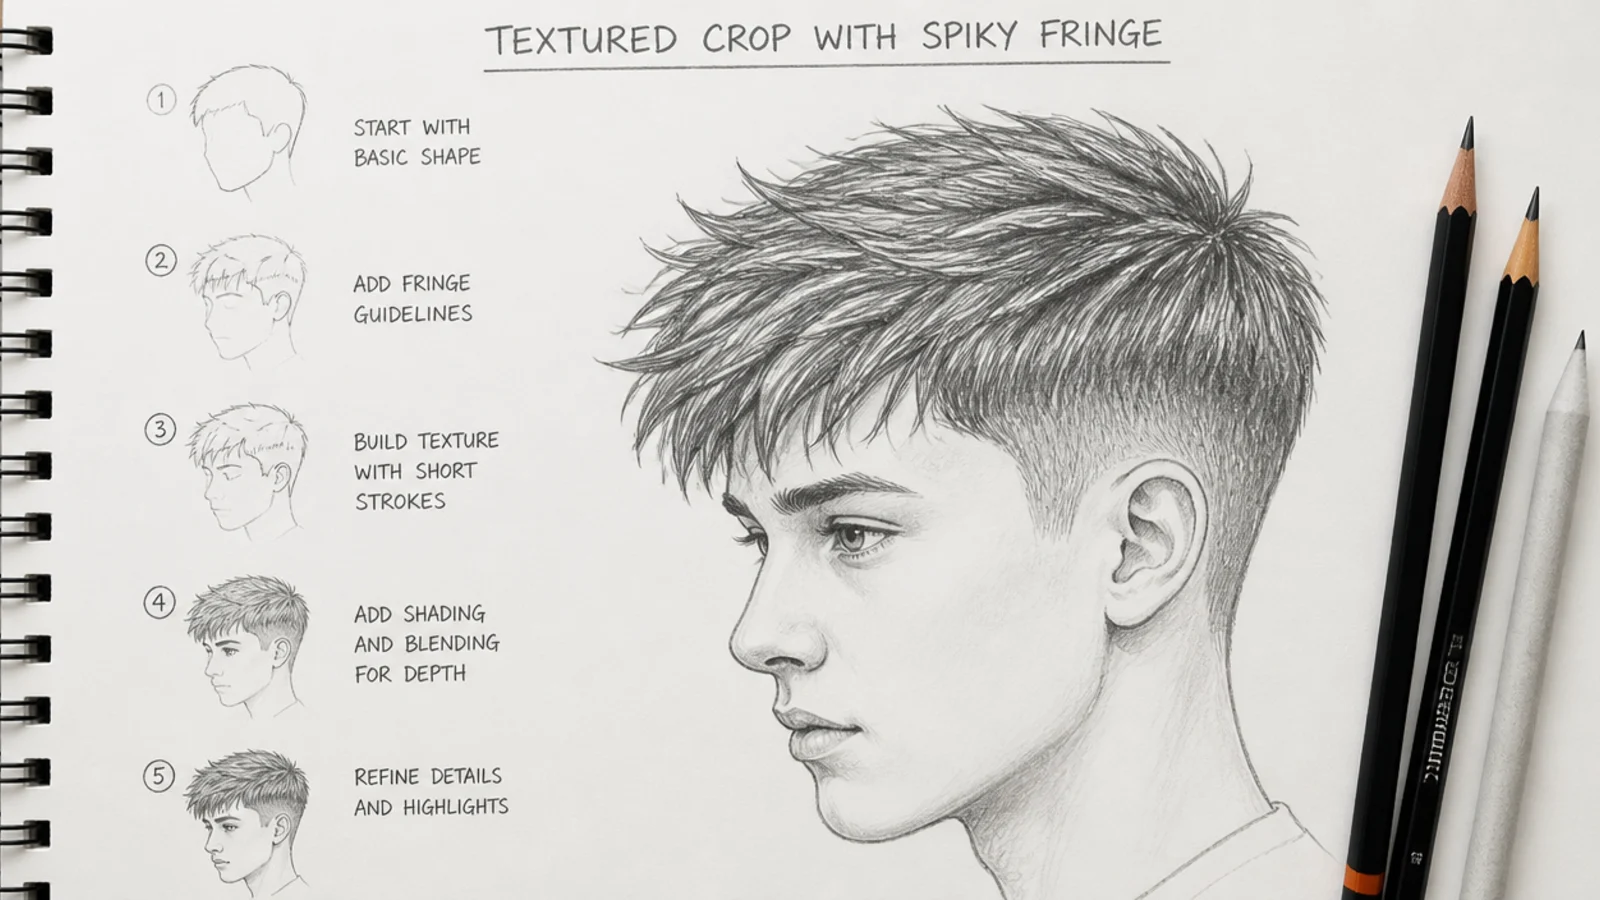
Texture reads through the silhouette, not through interior busyness. Break the top edge into short irregular clumps two or three strand widths across and keep the interior value flat, because a crowded interior under a smooth outline reads as noise rather than as texture.
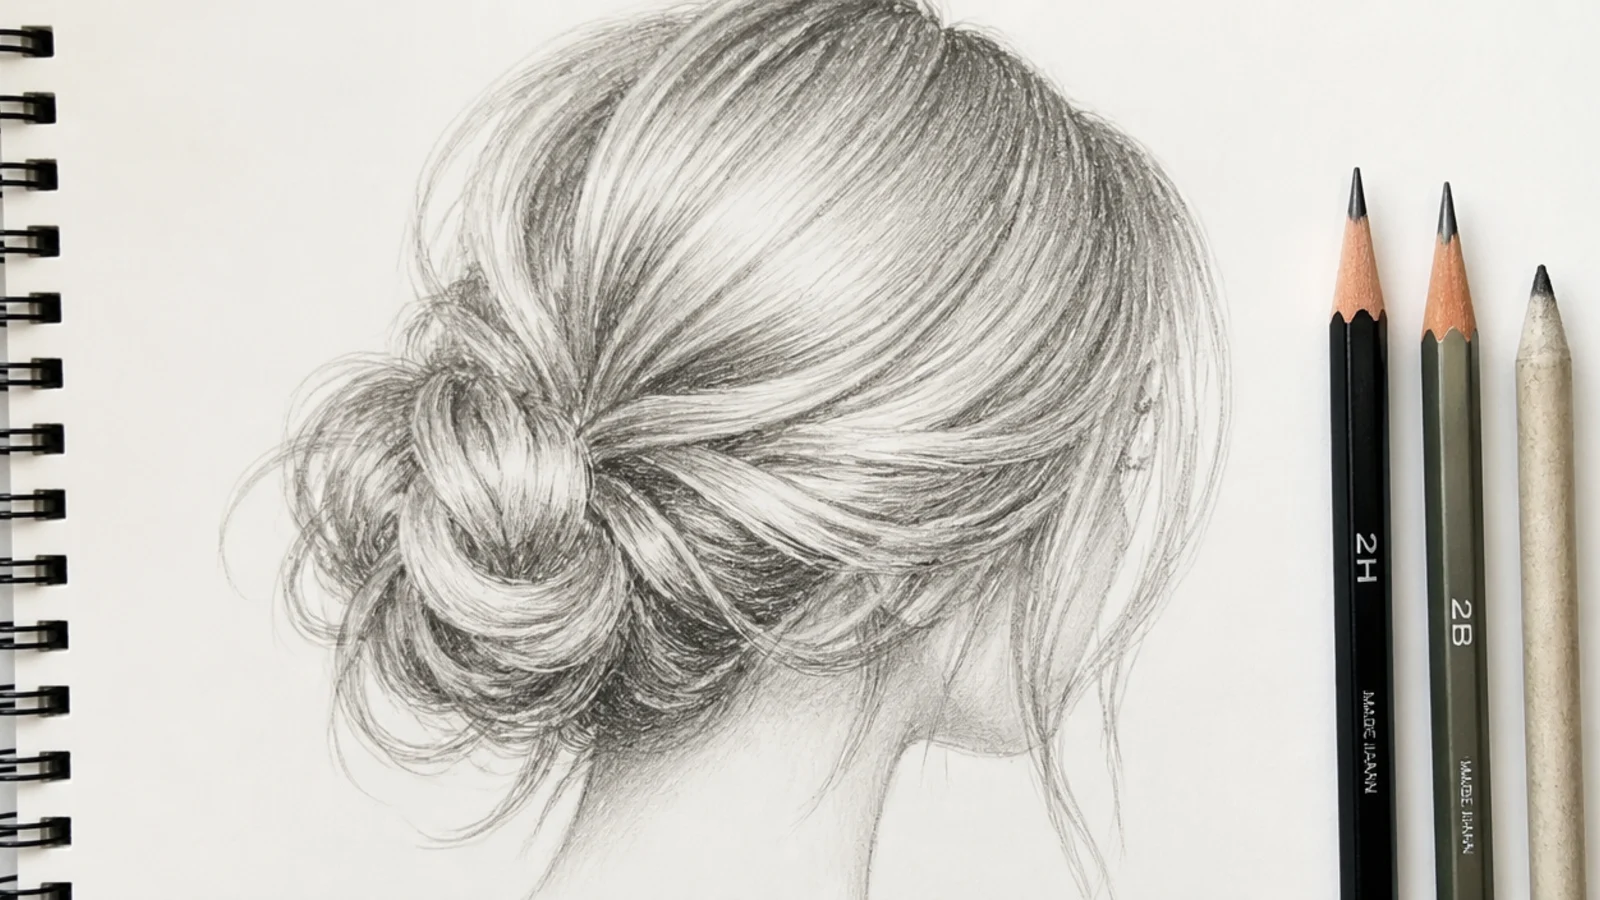
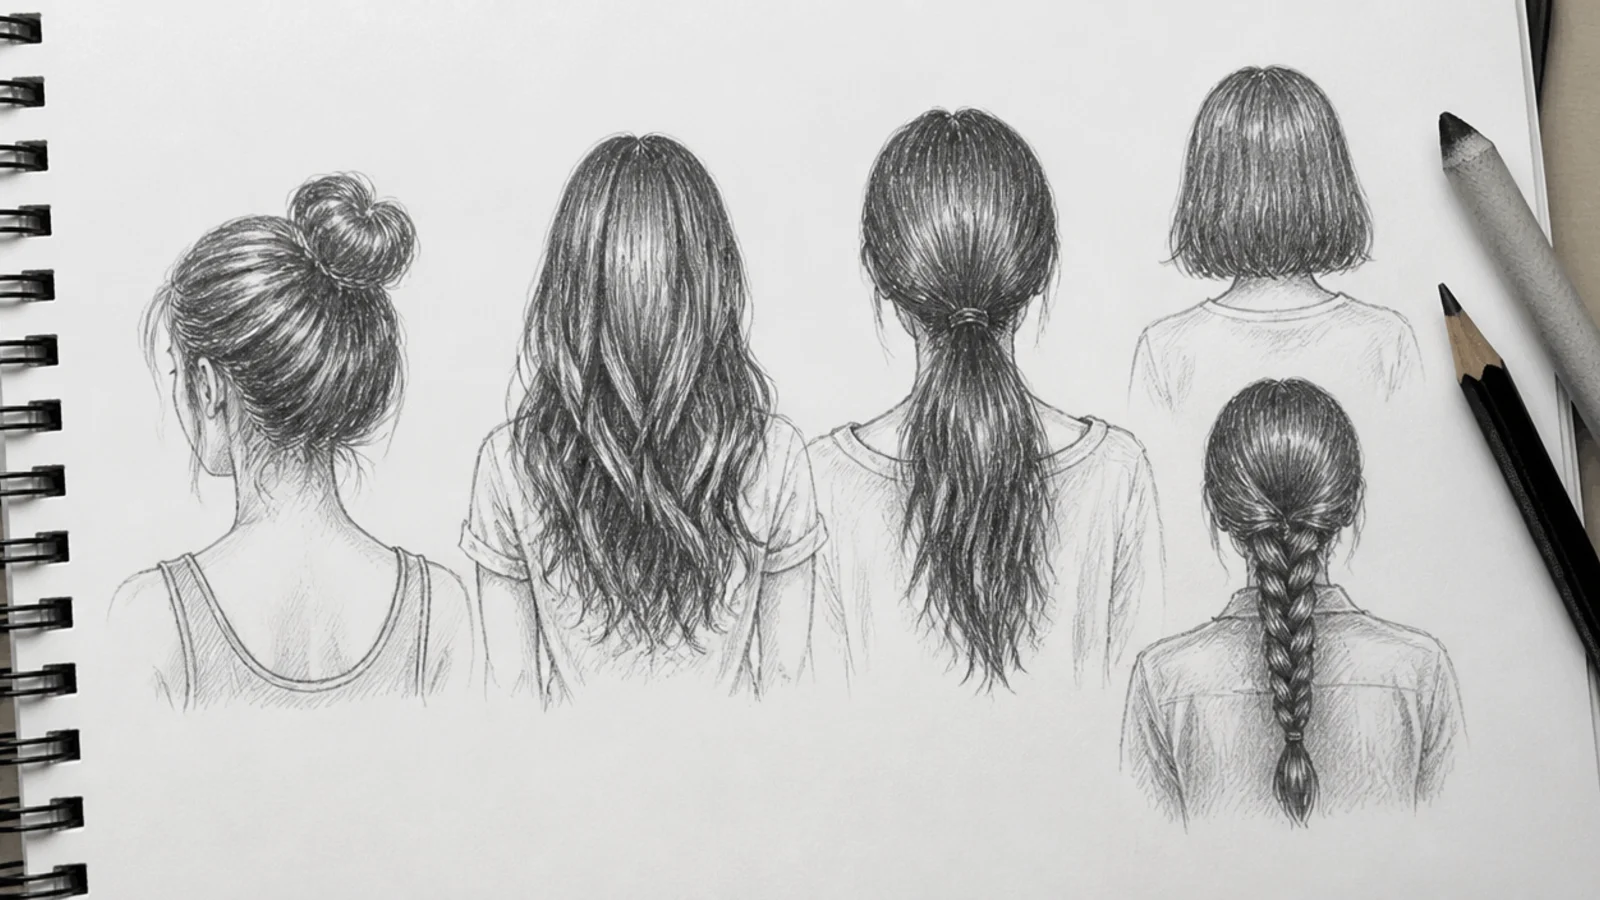
7. Messy Bun Back View
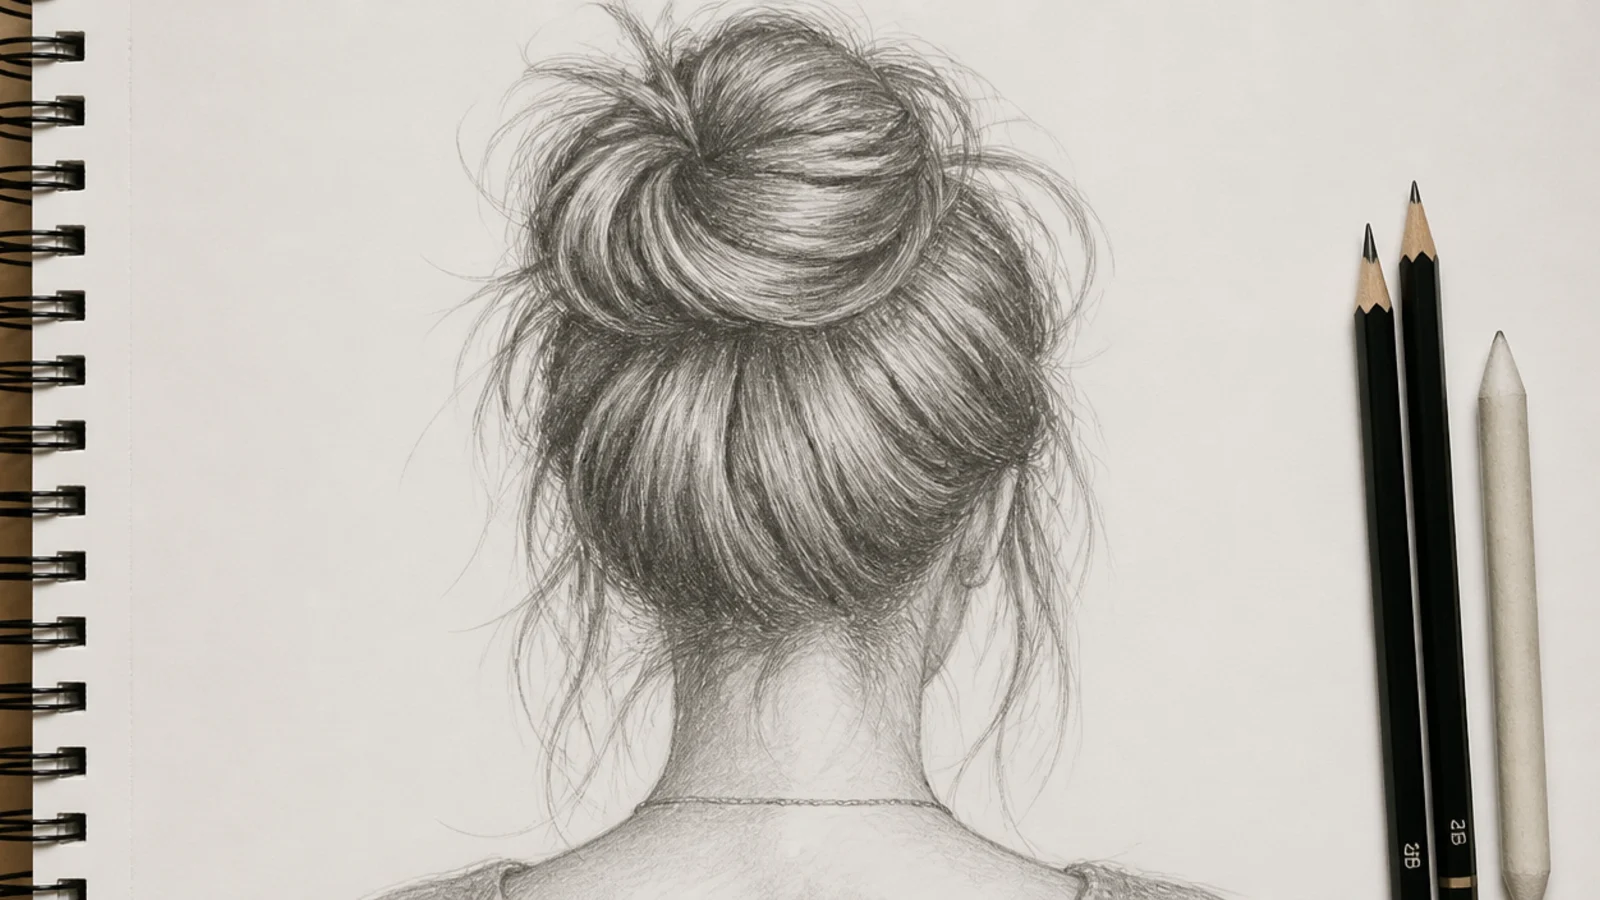
A bun is a sphere with strands wrapping it, and the wrap direction has to stay consistent all the way round or the knot falls apart visually. Darken the gap where the bun meets the back of the head, since that single shadow does more for the read than any quantity of loose strand detail.
8. High Ponytail in Motion
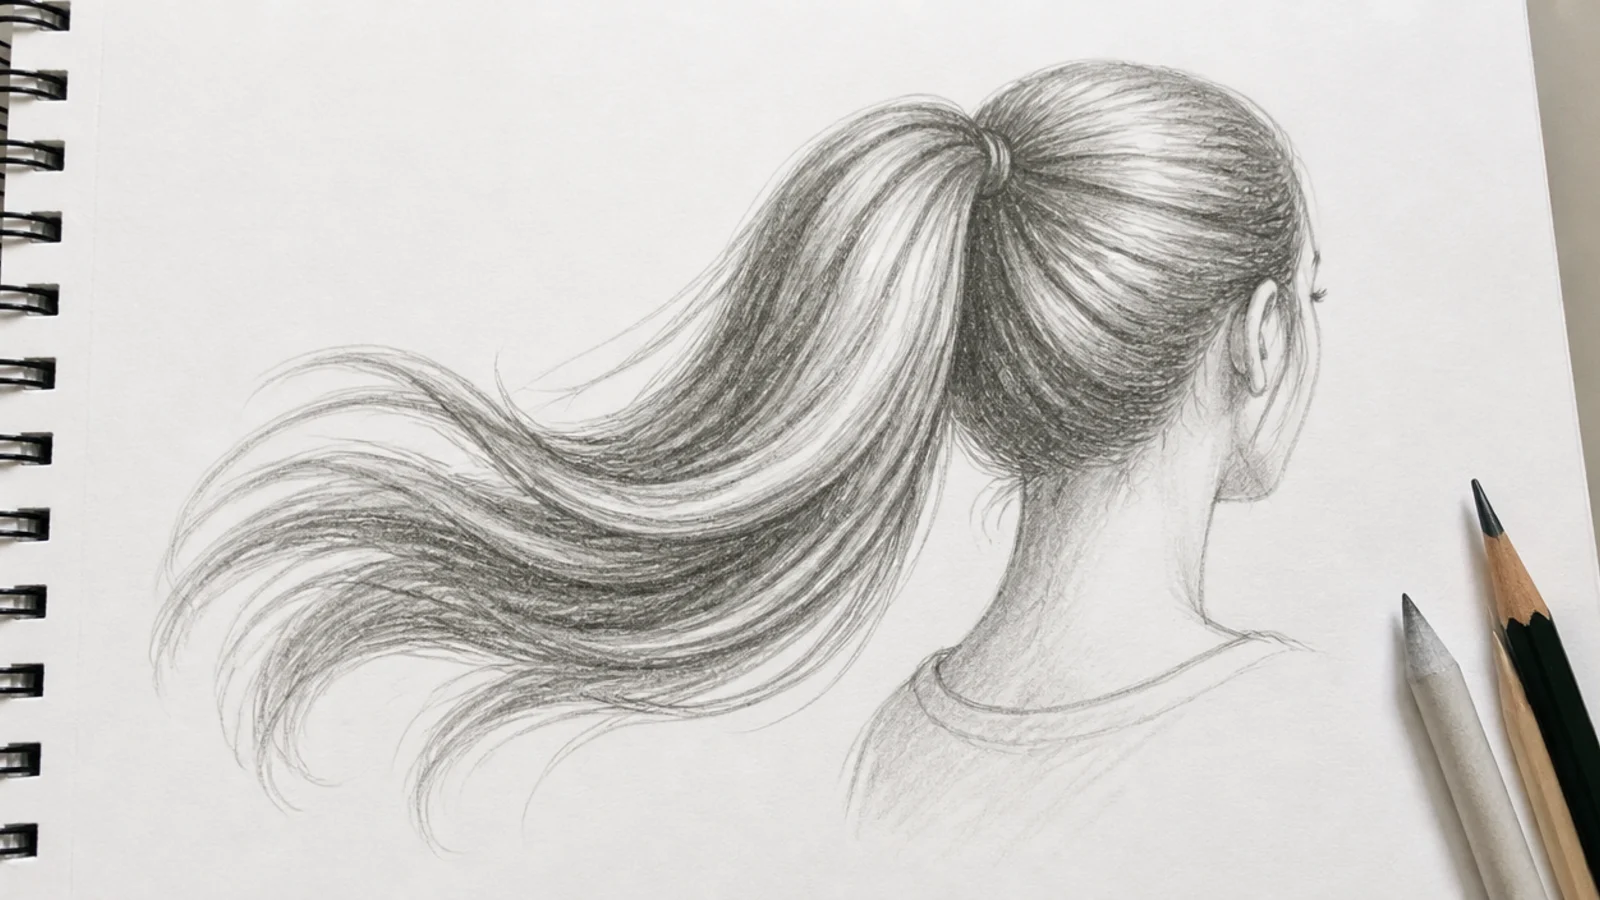
Every strand converges on the tie, so the drawing lives or dies on that convergence. Draw the gathering lines first as a fan narrowing to a point, then let the tail spread again below it, because hair under tension shows the direction of growth more clearly than loose hair ever does.
9. Three Strand Braid
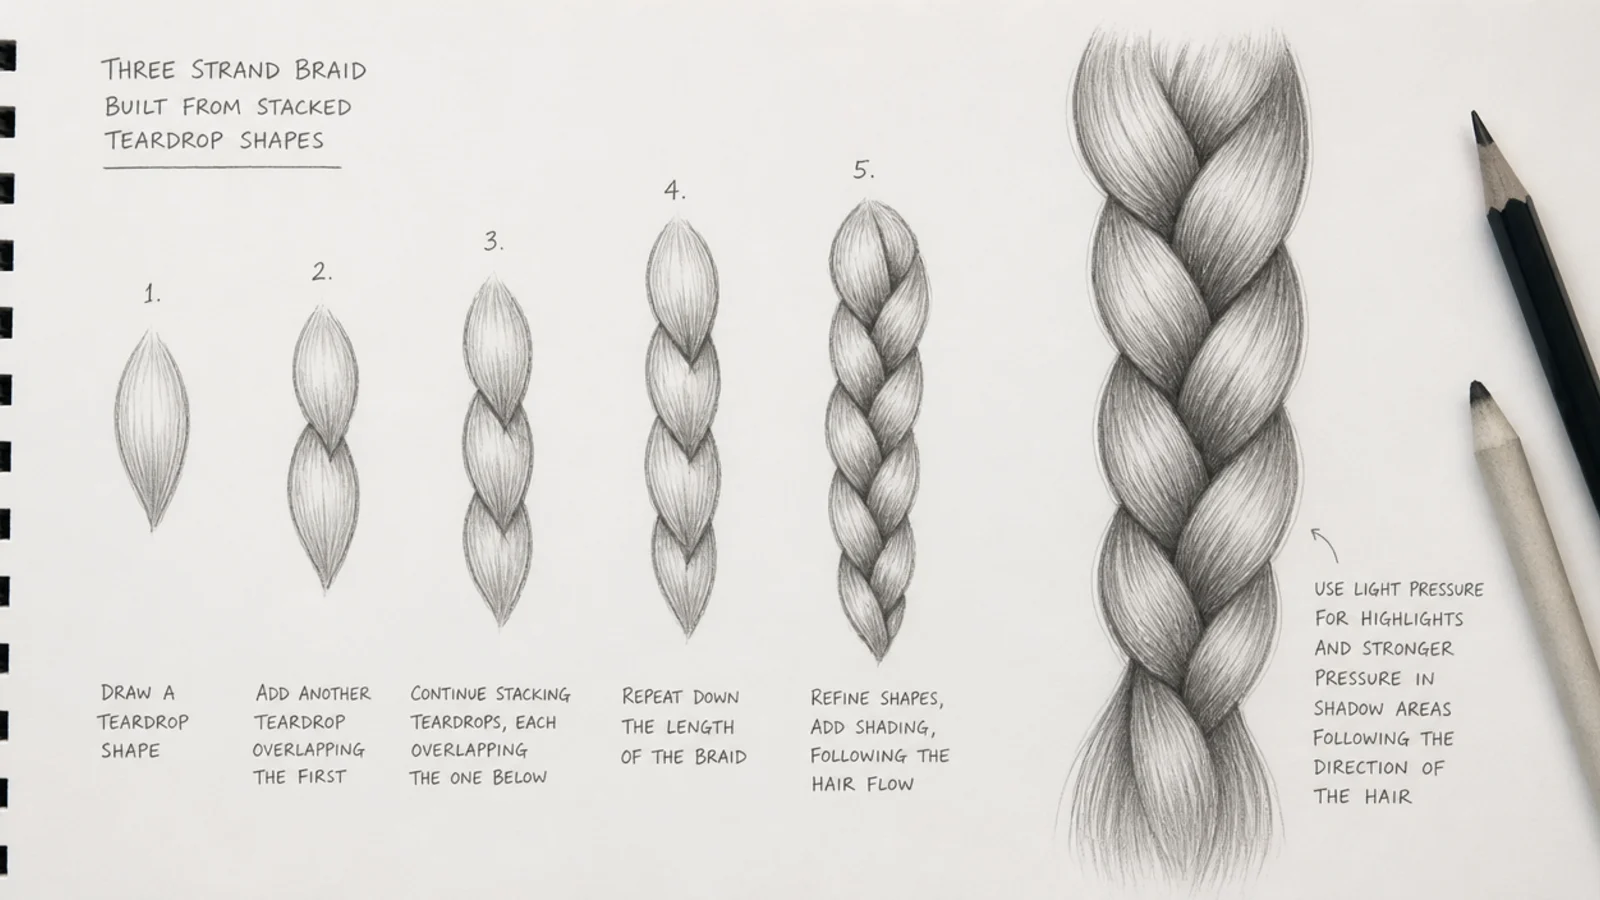
A braid is a stack of interlocking wedges, each overlapping the one below on alternating sides. Draw those wedges as flat chevrons before adding a single strand and shade the seam between them darkest, because the deep line between units is what makes a braid read as woven.
10. Curtain Bangs on the Forehead
Curtain bangs split from a central point and sweep outward, so the two halves need matching length but not matching shape. Keep the inner edge shorter than the outer edge and leave forehead visible between them, or the fringe collapses into a solid block sitting on the brow.
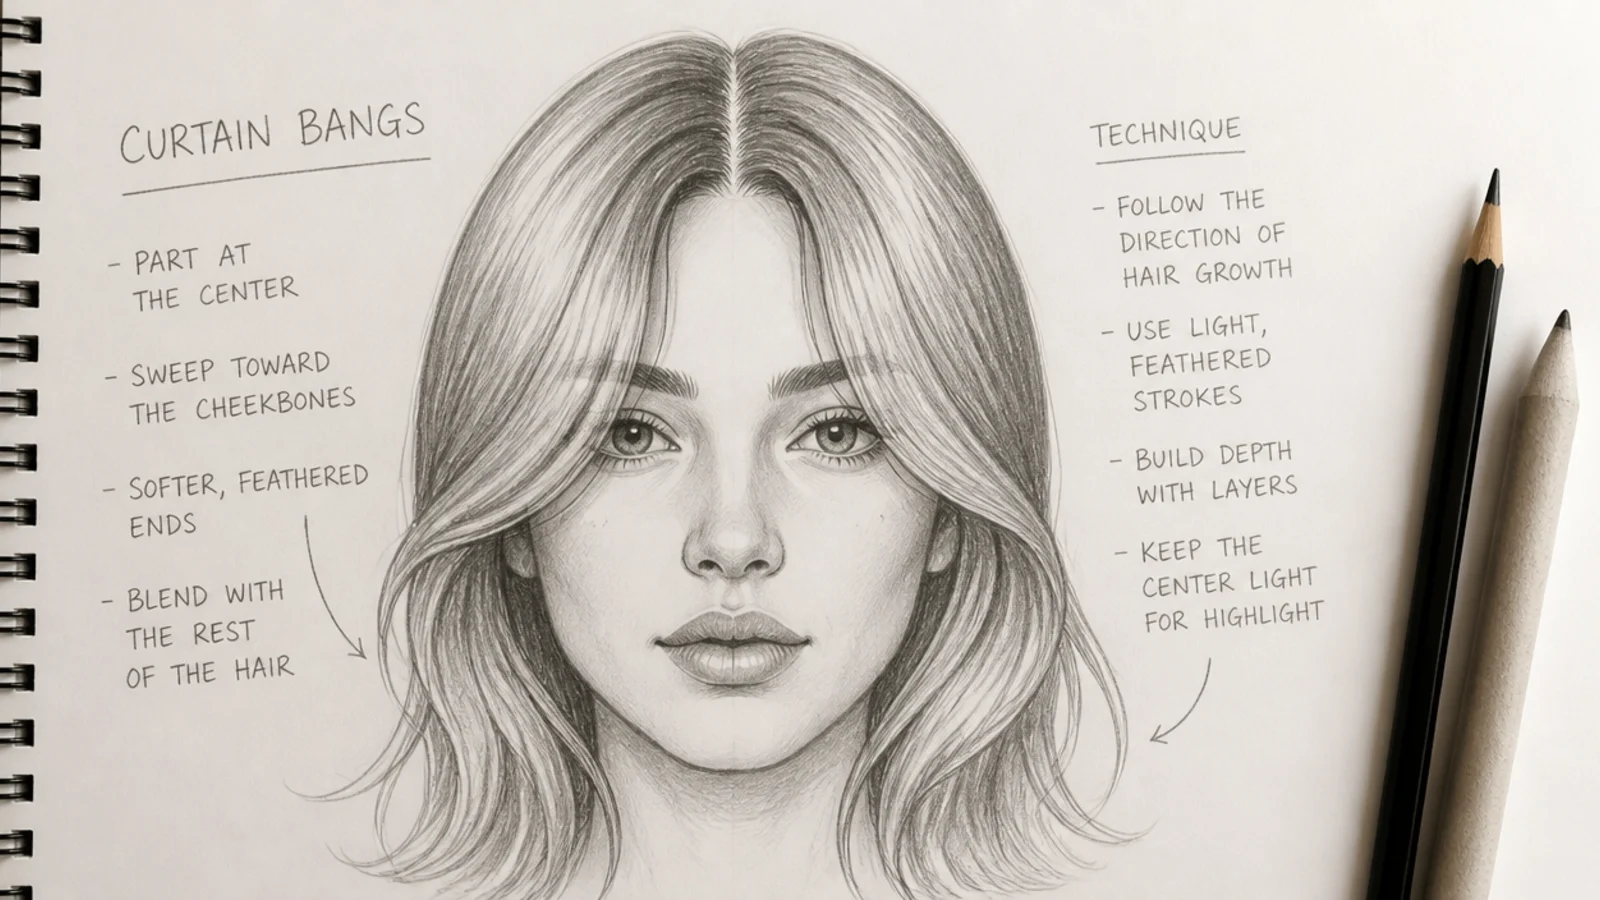
11. Shading Blonde Hair
Blonde is not bare paper, it is a narrower value range sitting higher up the scale. Use the same three value structure as dark hair but move all three lighter, keeping the darkest core around a 2B instead of a 6B, because the relationships say blonde rather than the absence of shadow.
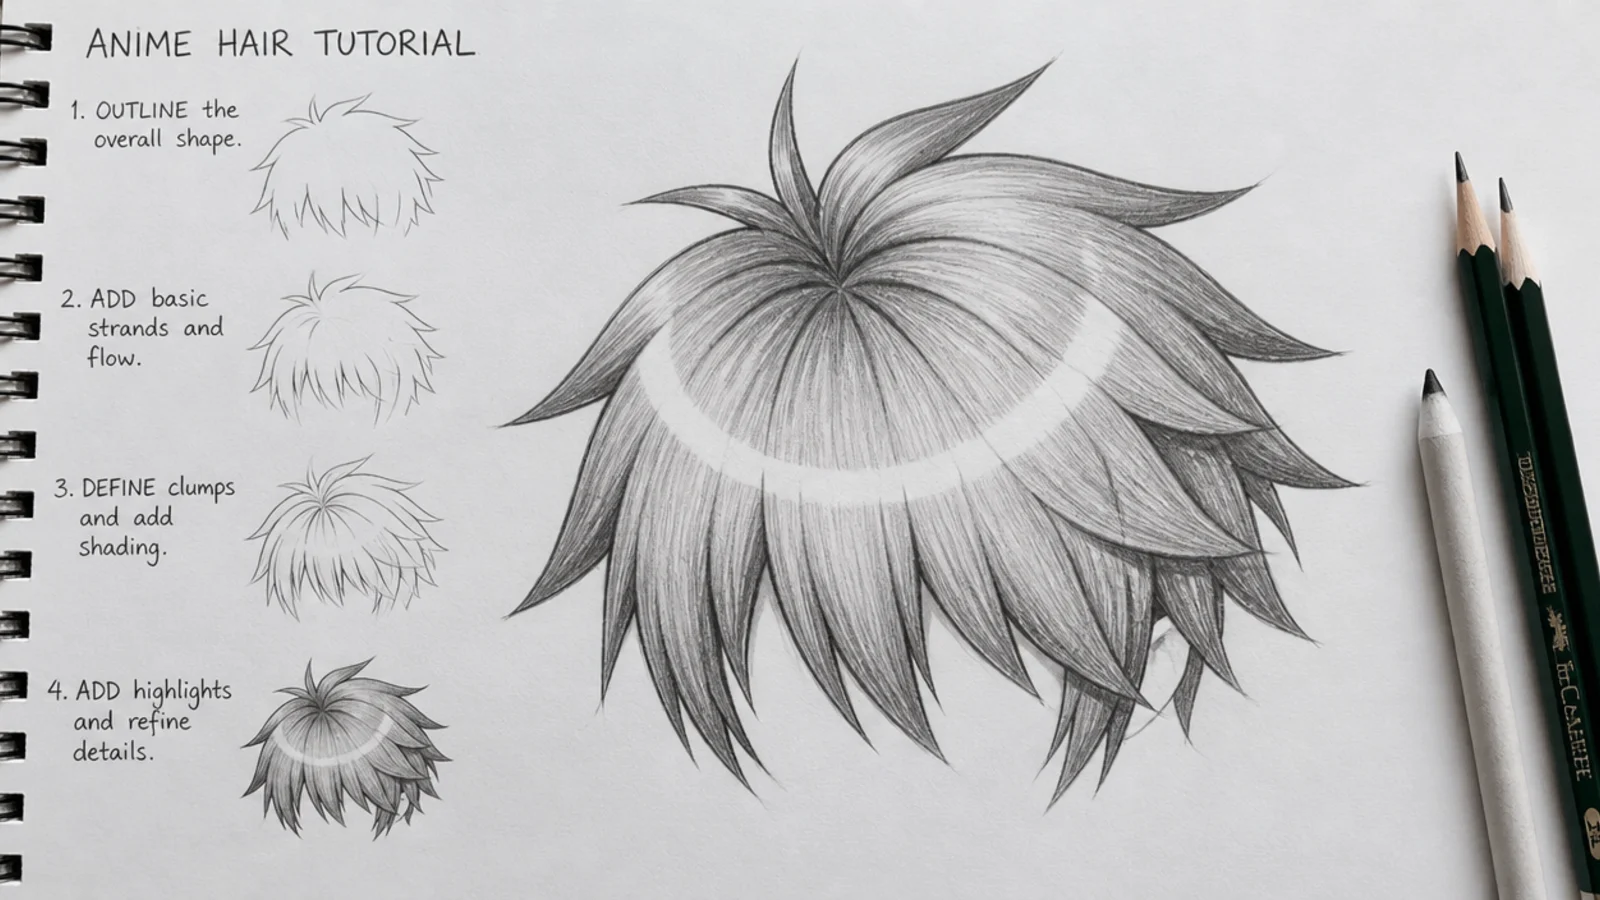
12. Anime Hair Spikes
Stylised hair swaps strands for clean wedge shapes that all point away from one crown. Keep every wedge tapering to a sharp tip and vary the lengths, since equal spikes read as a repeating pattern rather than as hair, then lay one flat highlight band straight across the mass.
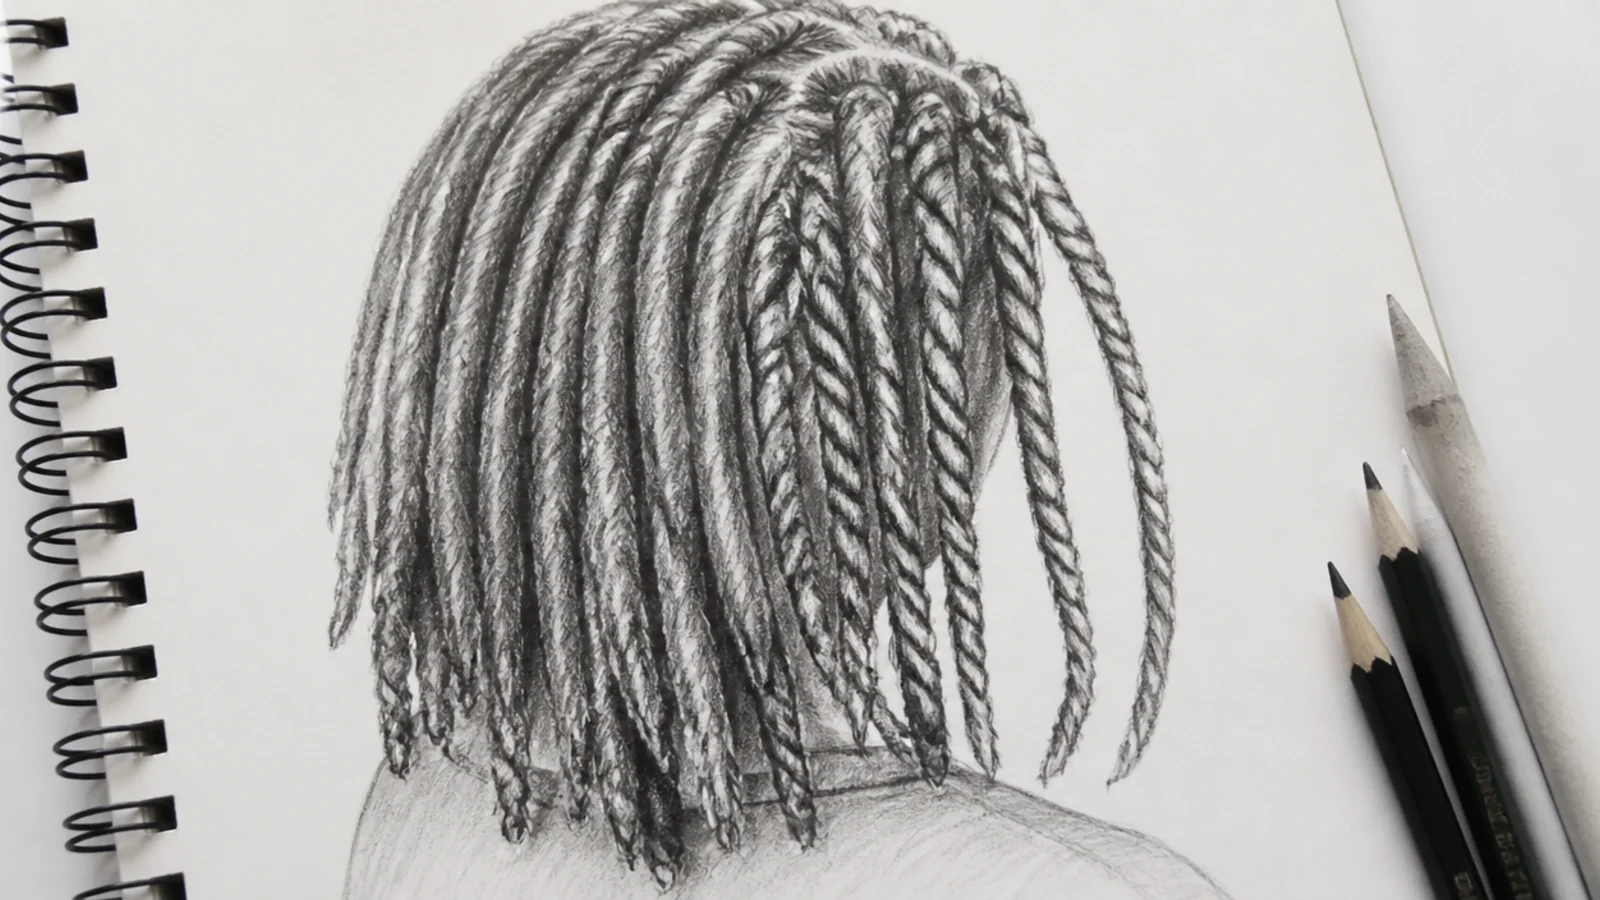
13. Locs and Twists
Each loc is its own cylinder with its own highlight and its own shadow, which makes this an exercise in repeating a form without repeating it identically. Vary the widths slightly, let some cross in front of others, and darken every gap between them so the rope shapes separate.
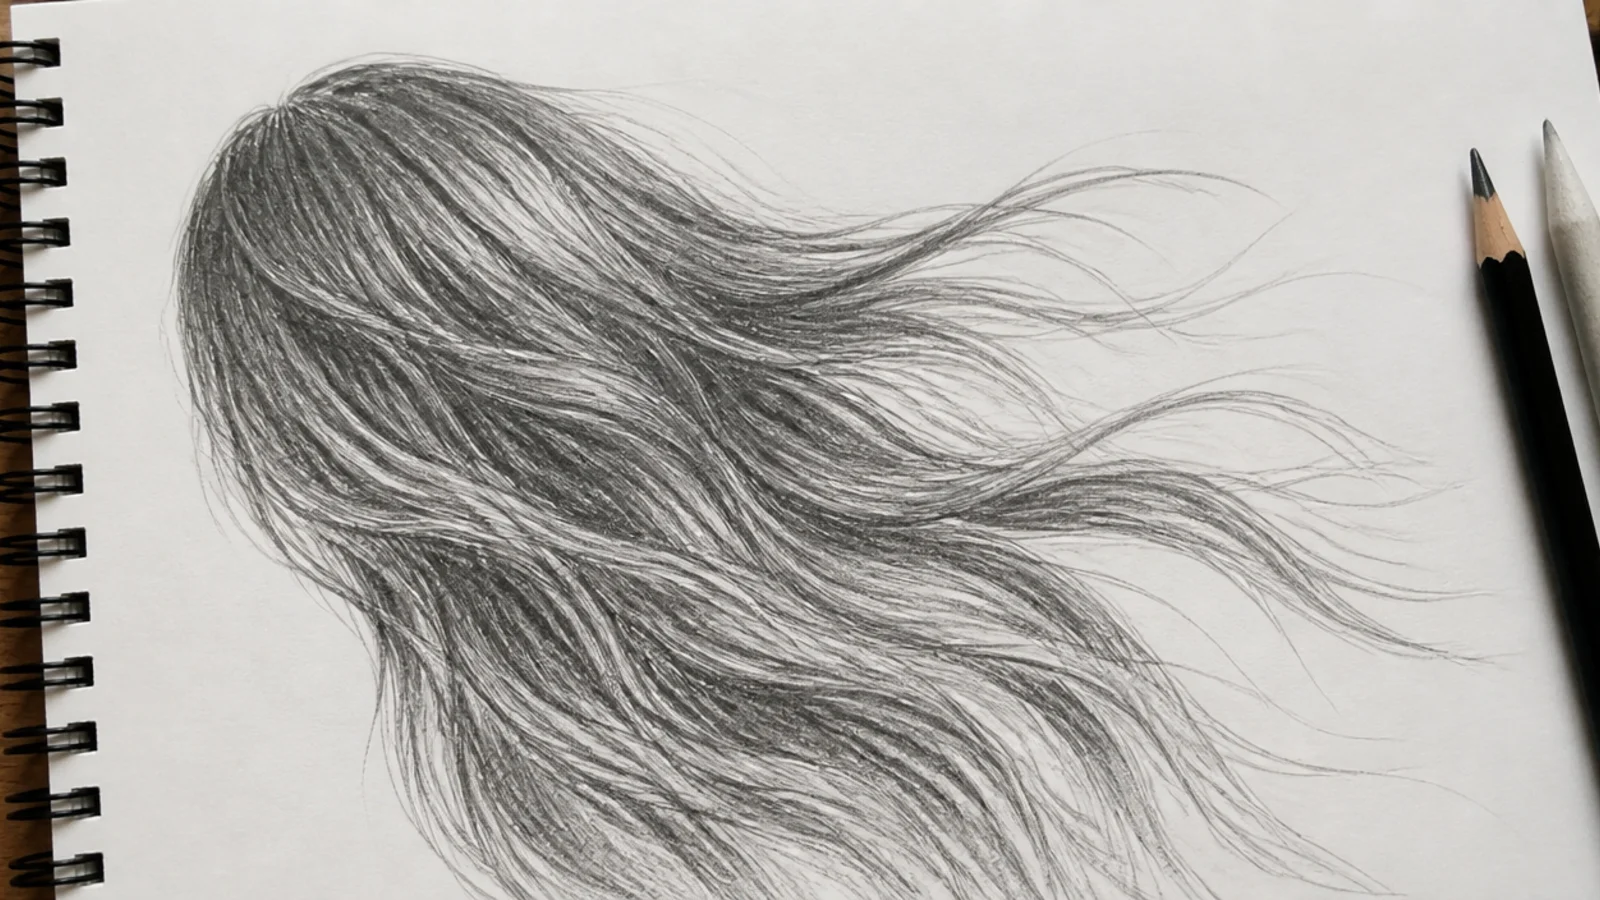
14. Wind Blown Hair
Wind gives hair one dominant direction plus a few escapees, and the escapees are what sell it. Draw the bulk as a single sweeping mass, then let three or four strands break away against the flow, because an evenly windblown head just reads as neatly combed.
15. Small Scale Hair
At thumbnail size individual strands vanish and only silhouette and value survive, so drawing them wastes effort and muddies the shape. Block the outline, lay two values, and add at most four strand lines at the edge, because anything narrower than the pencil point is noise.
How to Sketch Hair Step by Step
Step 1. Skull and Hairline
Establish the skull first, because everything above it is thickness rather than bone. Mark the hairline roughly a third of the way down from the top of the head and keep its edge irregular, since a smooth arc reads as a swim cap while an uneven temple or a slight peak reads as a person.
Step 2. Block the Silhouette
Draw the outer shape of the hair as one closed outline sitting clear of the skull, with nothing at all inside it. Squint at what you have, and if you cannot name the hairstyle from that shape alone then the shape is wrong and no amount of interior detail will rescue it.
Step 3. Flow Lines
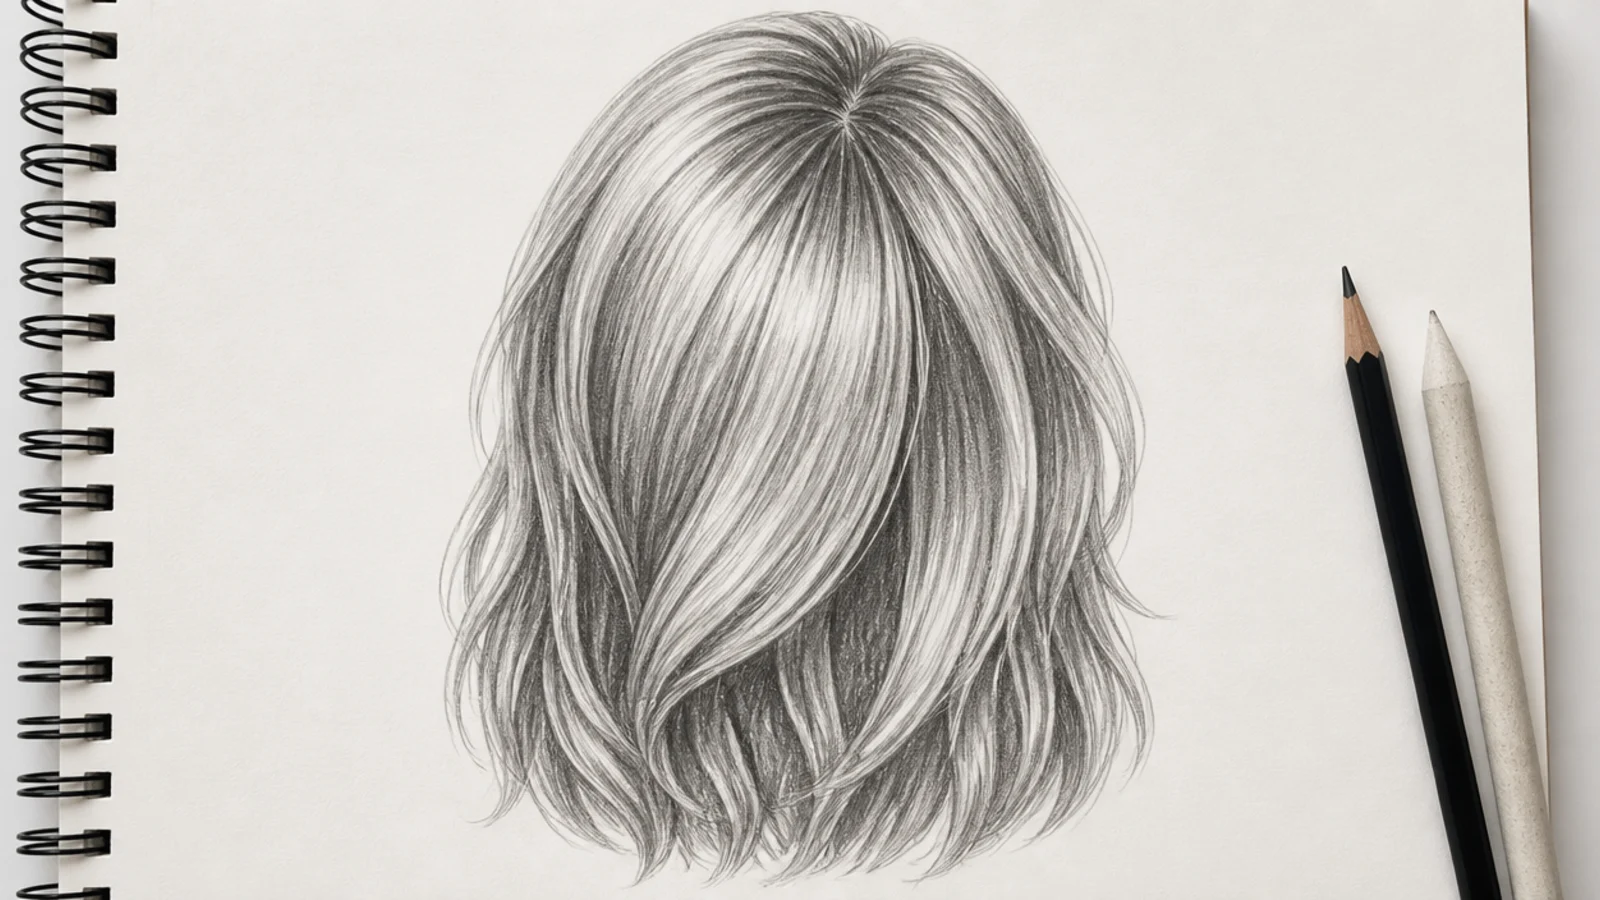
Mark four or five long lines running from the crown to the ends along the direction the hair actually travels. These are the spine of the drawing, because every strand added later belongs to one of them, and hair that ignores them reads as static instead of as growing from a point.
Step 4. Sections
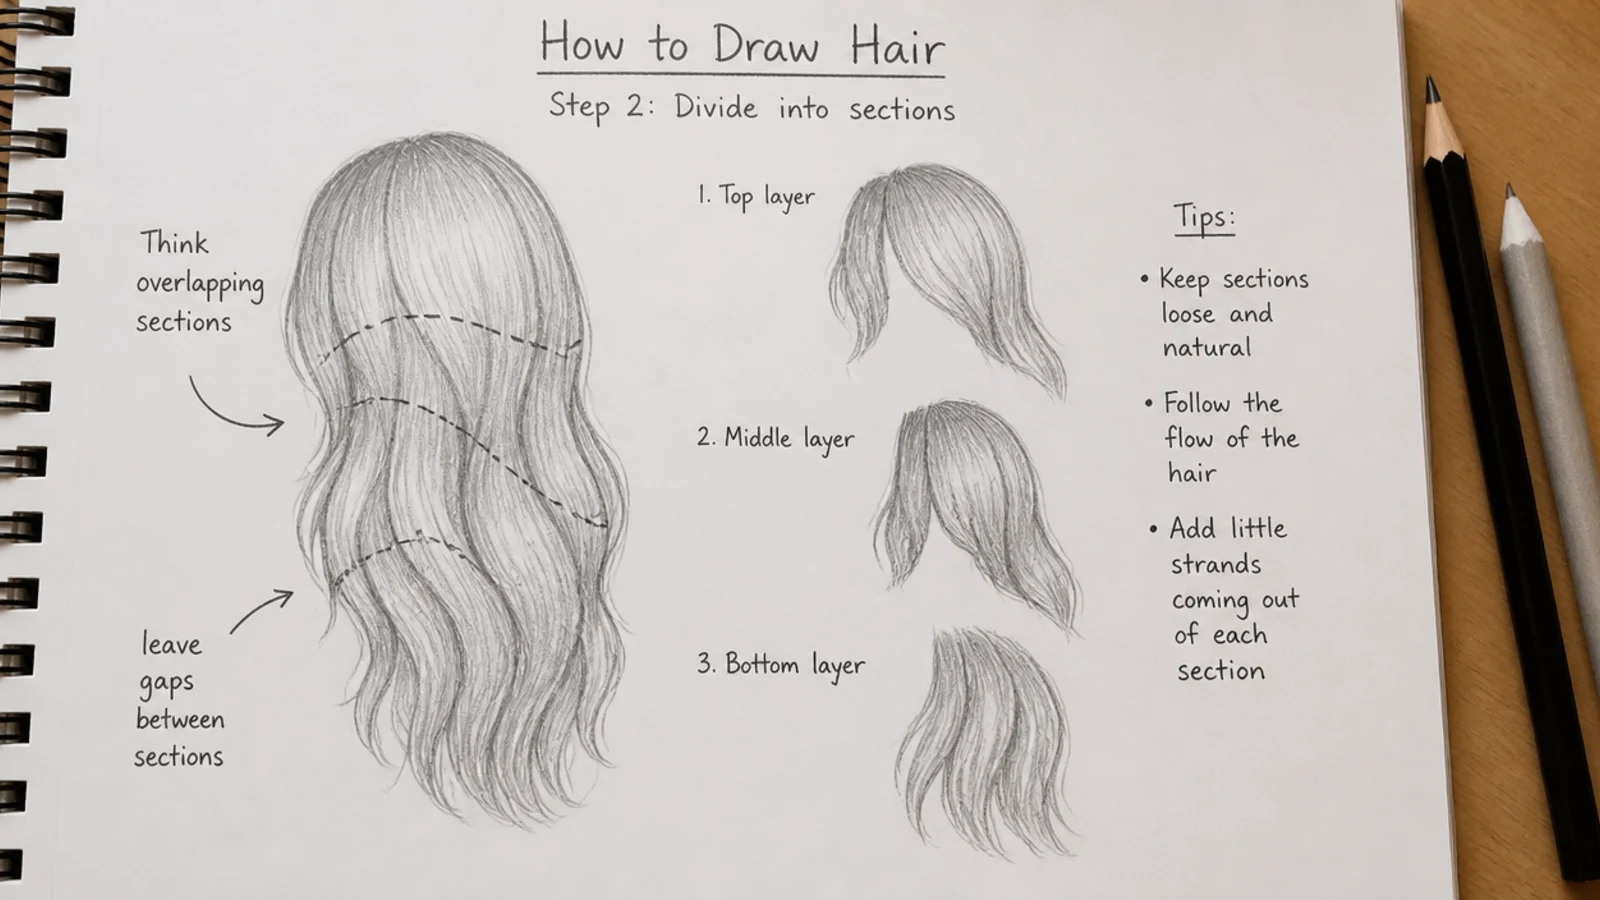
Divide the mass into a handful of overlapping groups along those flow lines, varying the widths so no two match. Sections are what give you somewhere to put the dark values, and a mass without them can only ever be shaded as one undifferentiated lump.
Step 5. Mid Tones
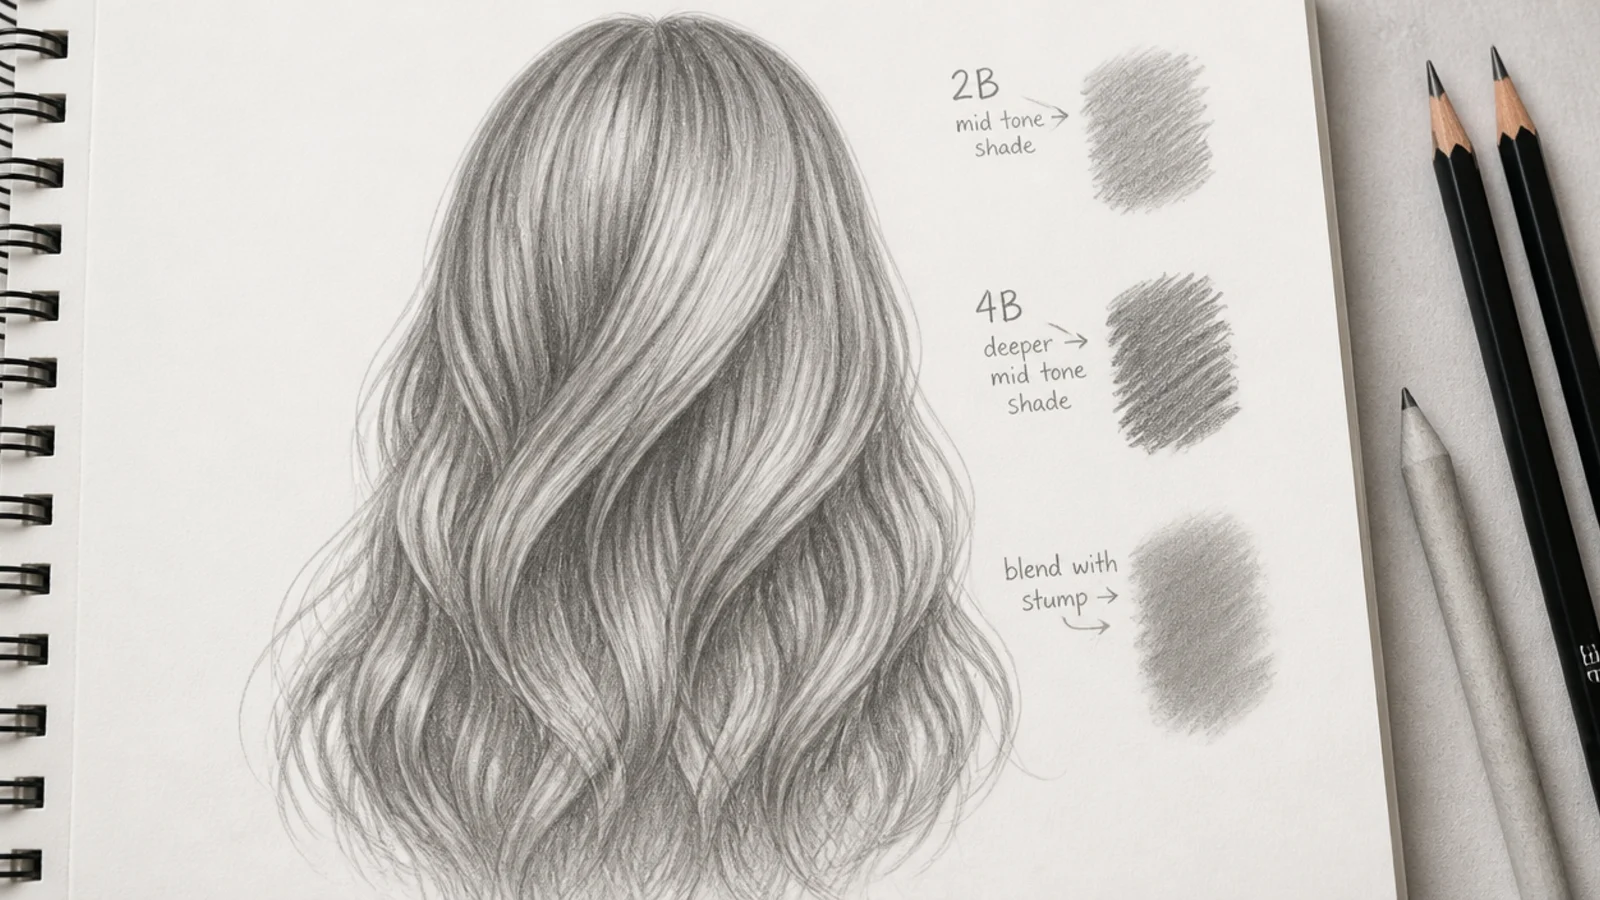
Lay a flat HB or 2B tone over everything except the highlight band, stroking in the direction of the flow lines so the grain of the shading already points the right way. This one pass removes the white paper as a competing value and lets the darks you add next actually register.
Step 6. Dark Cores
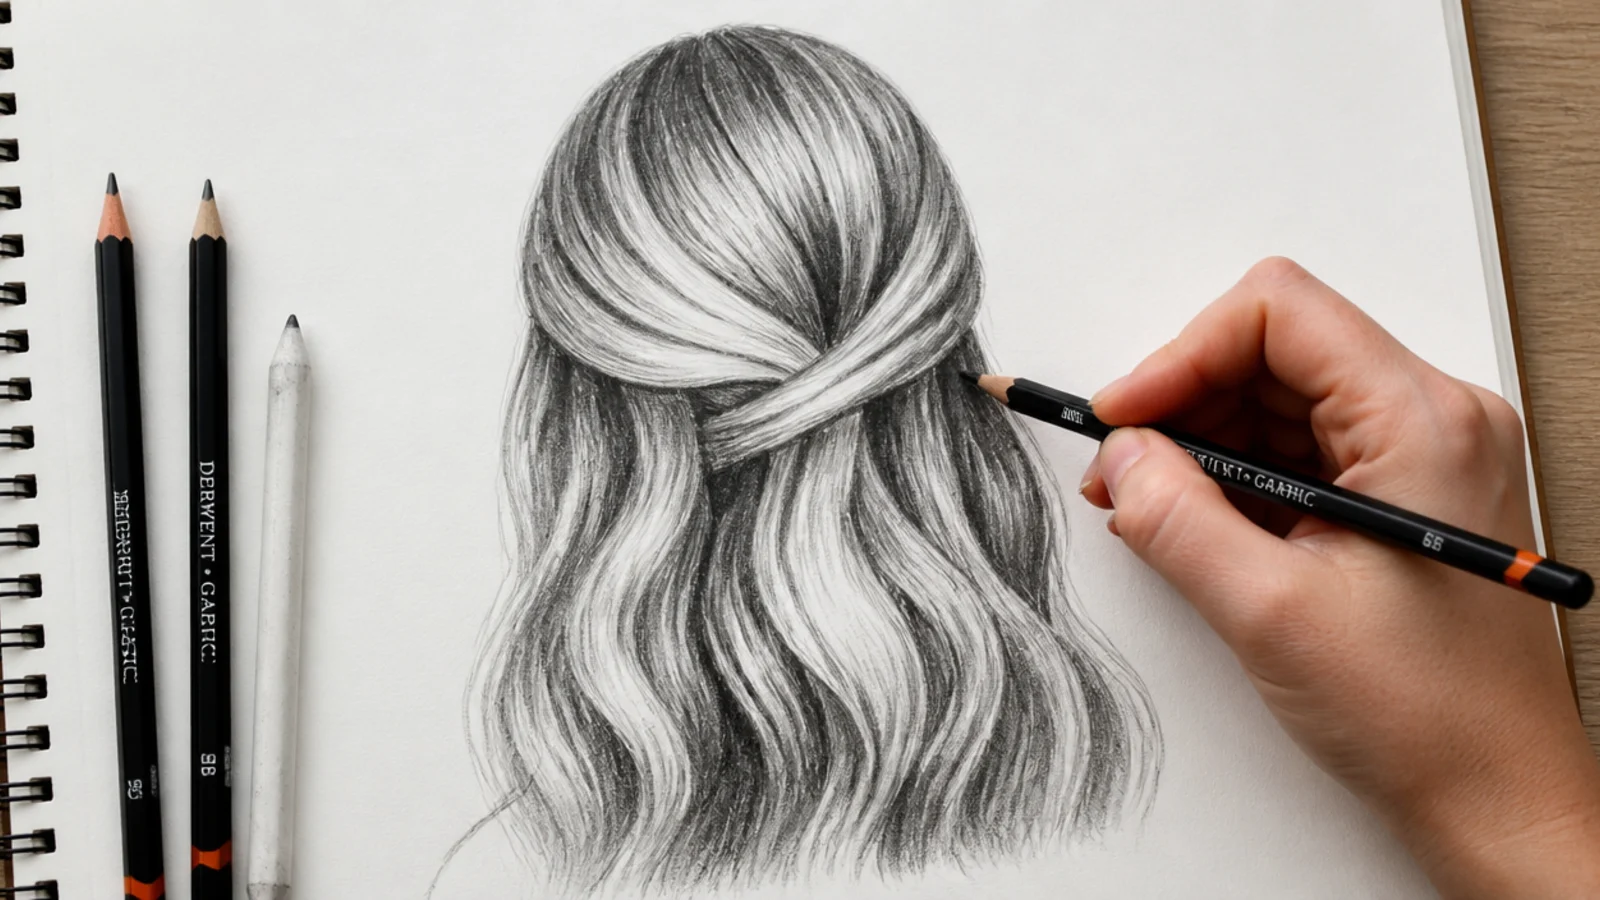
Push a 6B into the gaps between sections, under the top layer where hair falls over hair, and at the roots beside the parting. These are the deepest values in the drawing and the reason it will look like hair, because the eye reads depth from the darks rather than from the strands.
Step 7. Strands and Flicks
Now, and only now, add individual strands — a few catching the light along the highlight band and a scatter breaking the silhouette at the edges. Lift some with a sharpened kneaded eraser rather than drawing around them, because a lifted strand sits above the mass while a drawn one sits on it.
Step 8. Check and Fix
Hold the drawing up to a mirror or photograph it on a phone. Reversing the image exposes lopsided silhouettes and drifted flow lines your eye stopped noticing an hour ago, and at this stage the corrections are almost always to the outline rather than to the detail.
Final Thoughts
The tutorial is really just the order. Shape, flow, value, strands — in that sequence a mediocre drawing still reads as hair, and in any other sequence a careful one still reads as a wig. If a sketch is not working, the fault is almost never in the strands you have drawn; it is in a silhouette that sits too close to the skull or a set of flow lines that never got marked at all.
Work the fifteen exercises small, four or five to a page, and stop each one as soon as it reads. A page of thumbnails teaches the structure far faster than a single laboured portrait, because you get fifteen attempts at the silhouette instead of one. For the texture that gives beginners the most trouble see the how to curly version. More in Hair Drawing. See also the anime version.