10 Easy Halloween Hairstyles for Kids
Ten easy Halloween hairstyles for kids — spider braids, pumpkin buns, cat ears, mummy wraps, and more, each doable at home in under 30 minutes.
In this article · 11
Halloween is the one night a kid's hair can be the costume, and the best kids' styles share two traits: they are built on braids or buns that actually stay put, and they use accessories to do the spooky work instead of heat or permanent color. Every style on this list takes under 30 minutes, uses drugstore supplies, and survives at least a few hours of trick-or-treating. Do a trial run the weekend before, because a style you have already done once takes half the time on the night. Pick by costume first, patience second, and hair length third.
1. Spider Web Braid
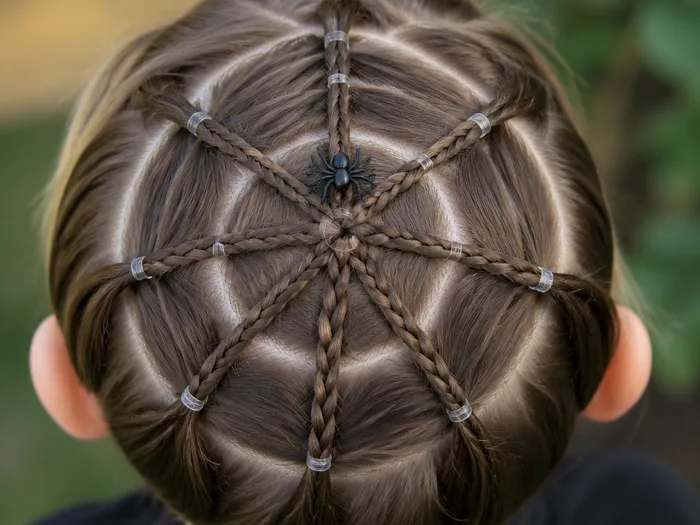
The spider web braid builds a web from clear elastics over a half-up section, so the web is structural rather than drawn on. Part the top half of the hair from temple to temple, then place a row of small elastics across it, splitting and rejoining each section to form diamond openings. The elastic grid grips the hair at a dozen points, which is why this style outlasts any drawn-on web by hours. Clip one plastic spider ring into the center of the web.
You will need: 8 to 10 small clear elastics, a fine comb, one spider ring clip. Works on medium to long hair, straight to wavy. Finish with a light mist of flexible-hold hairspray so the web keeps its shape.
Styling tip: build the web on slightly damp hair — the elastics grip better and the sections stay separated. Skip conditioner on the top section that morning; too much slip lets the elastics slide.
2. Pumpkin Bun
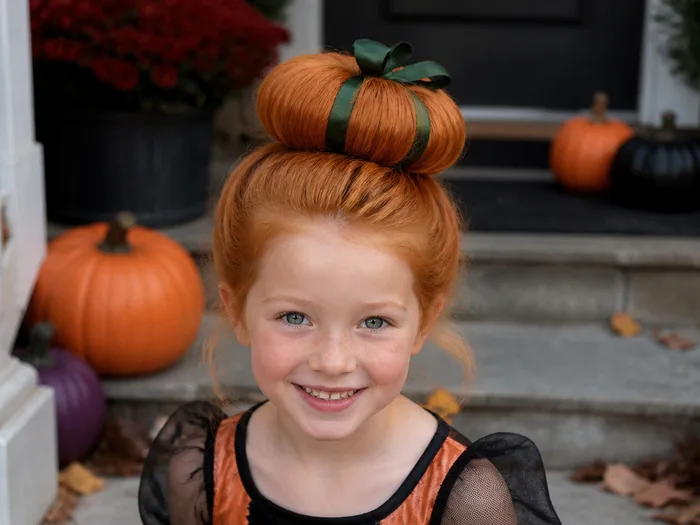
The pumpkin bun turns a high bun into a jack-o-lantern: orange temporary spray gives the color, and green ribbon twisted around the bun gives the ridges. Gather the hair into a high ponytail, twist it into a bun, and pin it. Loop a long green ribbon around the bun in four or five passes, pulling each pass snug so the bun dents into pumpkin segments. A short green pipe cleaner tucked into the top becomes the stem.
You will need: one hair tie, 4 to 6 bobby pins, orange temporary spray, green ribbon, one green pipe cleaner. Works on any hair long enough for a bun. Total time: under 10 minutes.
Styling tip: spray the bun after pinning, not before — sprayed hair is tacky and harder to twist. Protect the hairline with a folded towel while spraying so the color lands on the bun, not the forehead.
3. Braided Cat Ears
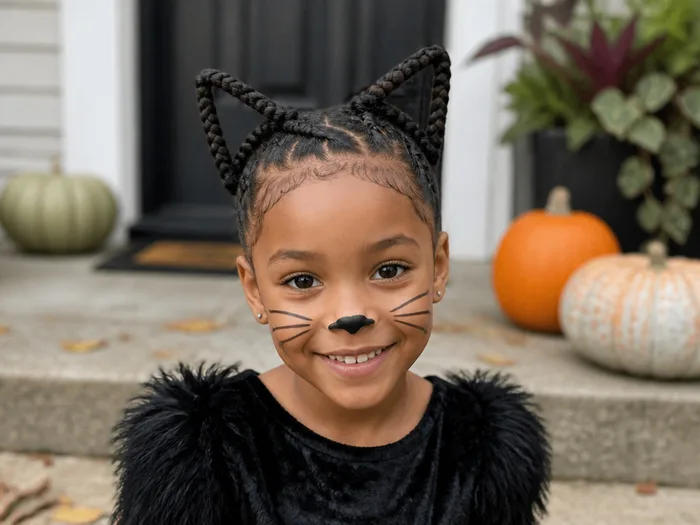
Braided cat ears replace a headband with two braids that stand up on their own, because a black pipe cleaner braided in as a third strand gives each braid a bendable wire core. Split the top hair into two sections, braid each one with a pipe cleaner as one strand, then bend the braids into triangles and pin the ends. The wire holds the triangle shape all night, unlike plain braids, which flop within an hour.
You will need: two black pipe cleaners, two small elastics, bobby pins. Works on medium to long hair. Swap in red pipe cleaners and you have devil horns with the same technique.
Styling tip: braid tightly for the first two inches so the ear base is firm, then loosen the braid toward the tip so the triangle tapers. Pin the braid ends under the braid itself, not against the scalp, so nothing pokes.
4. Witch Braids
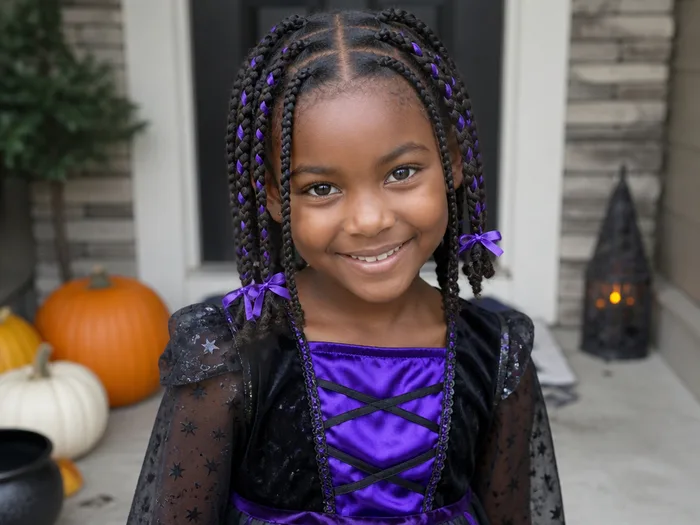
Witch braids split the hair into four to six small braids and weave ribbon through them, so the color and texture do the costume work while the braids keep everything locked down under a witch hat. Part the hair into sections, braid each one with a strand of purple, green, or orange ribbon worked in as the third strand, and tie the ends with tiny elastics. A few spritzes of temporary purple or green spray at the ends tie the whole look together.
You will need: ribbon in two Halloween colors, small elastics, temporary color spray. Works on any hair long enough to braid, including coily hair with a little gel on the sections. For more grown-up Halloween ideas, see our easy Halloween hairstyles roundup.
Styling tip: braid on damp hair with a pea of gel per section — the braids stay neat and the ribbon does not slip. Put the hat on last, after the spray dries, so the hat does not smear the color.
5. Skeleton Bone Braid
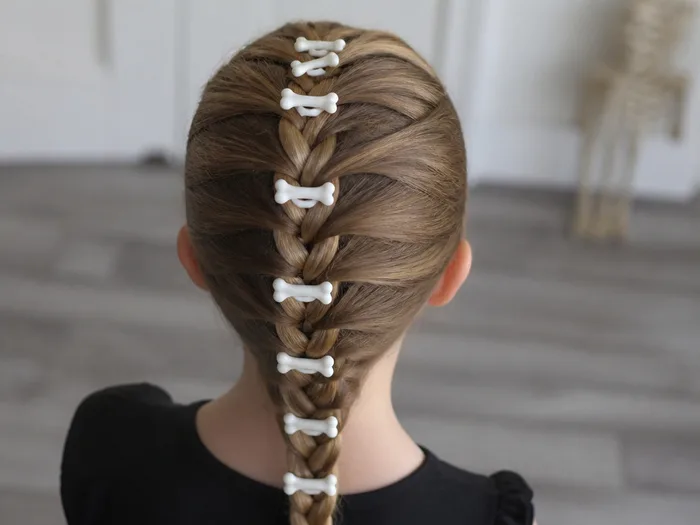
The skeleton bone braid weaves small white plastic bones into a standard three-strand plait, so the braid reads as a spine running down the back of the head. Start a French braid at the crown, and every two or three crossings, lay a plastic bone across the braid and plait one strand over it, trapping the bone inside the weave. The trapped bones cannot slide out, which is why this beats gluing bones on top.
You will need: a pack of small plastic bones from a Halloween store, elastics. Works on medium to long hair. The bones come out by simply unbraiding — nothing is glued or pinned.
Styling tip: use bones no longer than two inches, or they lever themselves out of the braid. Alternate bone sizes — small, large, small — so the spine looks organic rather than uniform.
6. Spider Bun
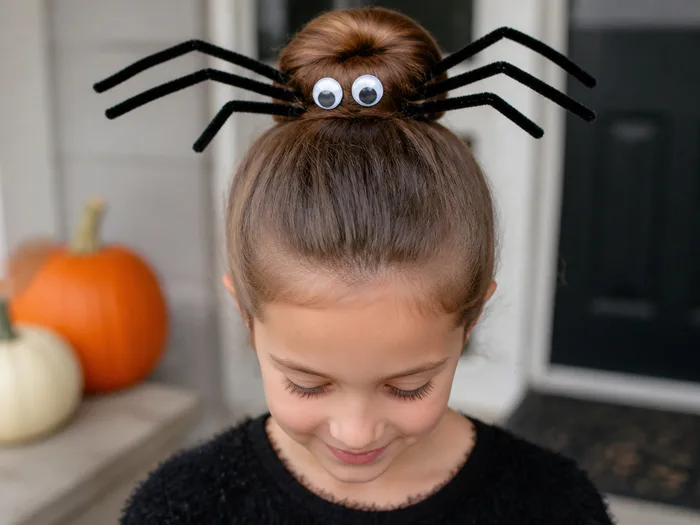
The spider bun is a high bun with eight pipe-cleaner legs pinned around it, and it works because the legs are anchored under the bun's elastic, not stuck on top. Make a high ponytail, wrap it into a bun, then slide four bent black pipe cleaners under the elastic so four legs stick out on each side. Bend each leg into a zigzag. A black pom-pom and two googly eyes glued to bobby pins finish the spider's face.
You will need: one hair tie, four black pipe cleaners, a black pom-pom, two googly eyes, two bobby pins. Works on any hair long enough for a bun. Total time: under 10 minutes.
Styling tip: bend the legs after pinning, not before — pre-bent legs snag on the hair. Keep the legs short, about three inches, so they do not catch on doorframes and costumes.
7. Bat Space Buns
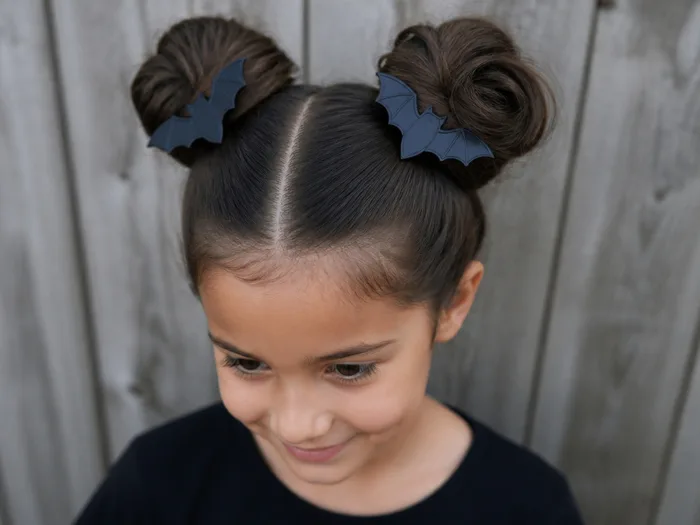
Bat space buns use two high buns as the bat's body, with bat-shaped clips or felt wings pinned behind each bun to complete the silhouette. Part the hair down the middle, make two high ponytails, twist each into a bun, and pin a bat clip or a felt bat wing behind each one. The buns give the wings a solid anchor, so the whole shape survives running around — clipped-on wings with no bun behind them droop within minutes.
You will need: two hair ties, bobby pins, two bat clips or felt bats. Works on medium to long hair. Also great for a cat costume if you swap bats for cat-ear clips.
Styling tip: place the buns high on the crown, not at the sides, so the bat reads from the front in photos. A zigzag part instead of a straight one adds a little extra Halloween energy for free.
8. Mummy Wrap Ponytail
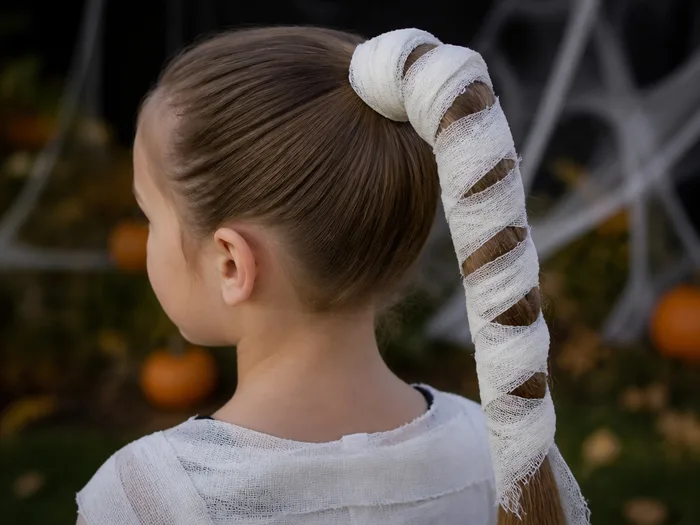
The mummy wrap ponytail wraps strips of white fabric or gauze around a ponytail, so the hair itself becomes the mummy's bandaging. Make a high or low ponytail, then wind torn strips of white cotton or medical gauze around it in a loose crisscross, tucking the ends under the elastic. Leave a few strip ends hanging loose for a ragged, unraveling effect. The wrap also hides second-day hair completely, which is a bonus on a school night.
You will need: one hair tie, white cotton strips or gauze, one small elastic to secure the last wrap. Works on any hair long enough for a ponytail, straight to coily.
Styling tip: tear the strips rather than cutting them — torn edges fray and look like old bandages, while cut edges look like ribbon. Mist the finished wrap with hairspray so the strips stay put.
9. Bubble Braid Ghost
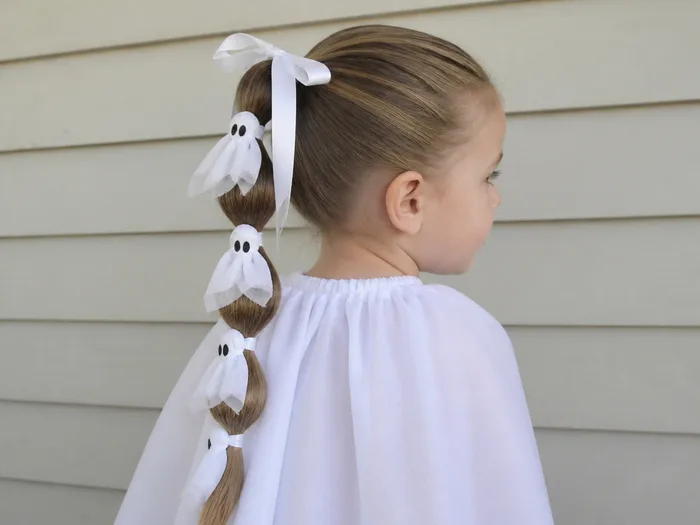
The bubble braid ghost turns a ponytail into a chain of puffs, because elastics spaced every two inches trap air in each section. Make a high ponytail, place elastics down its length, then gently tug each section outward to puff it into a bubble. Weave a white ribbon through the elastics and clip on two small black circles for eyes near the top bubble. The bubbles hold their shape because each elastic is a separate anchor point.
You will need: one hair tie, 5 to 7 small elastics, white ribbon, two black felt circles or clips. Works on medium to long hair. For a short-hair version, do two bubble pigtails instead of one ponytail — see our Halloween hairstyles for short hair roundup.
Styling tip: tug each bubble from the sides, not the top, so the sections puff outward evenly. Spray the finished braid lightly; heavy spray collapses the bubbles.
10. Puff Ball Pumpkins
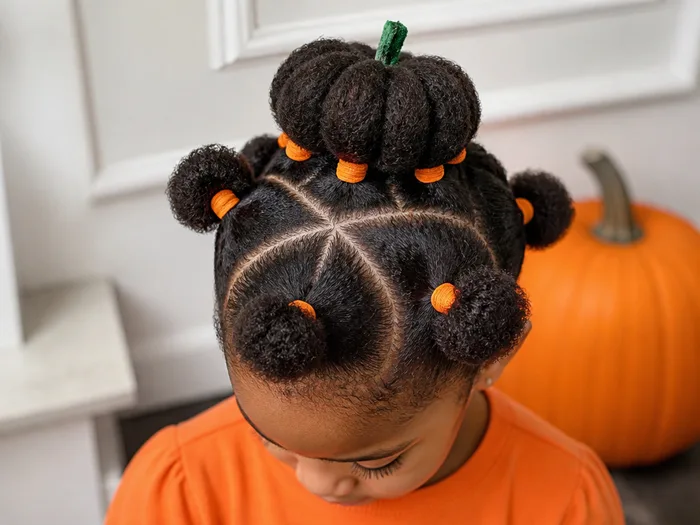
Puff ball pumpkins section coily or short hair into a dozen small puffs, each one tied off with an orange elastic and topped with a tiny green pipe-cleaner curl, so every puff is its own mini pumpkin. Part the hair into small squares, gather each square into a puff with a small elastic, and twist a two-inch piece of green pipe cleaner into a spiral on top. The sectioning is what makes it work: small, even sections hold their shape all day, while one big puff loosens.
You will need: small elastics in orange, green pipe cleaners cut short, a rat-tail comb for parting. Works on coily, curly, and short hair that will not hold a braid. Total time: 20 to 25 minutes for a full head.
Styling tip: moisturize each section with a little leave-in before tying it off — dry sections frizz and the puffs lose their round shape. Keep the sections no bigger than a coin so the pumpkins stay perky.
Narrowing Down Your Perfect Halloween Hairstyle for Kids
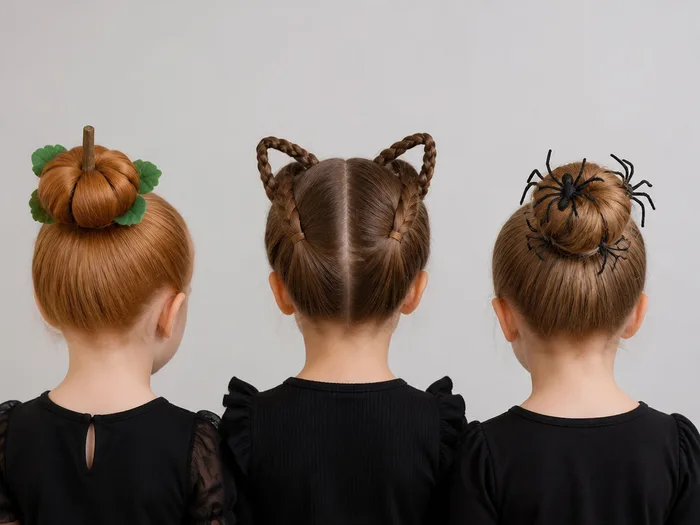
Start from the costume, then the clock. Witch, skeleton, or ghost: the witch braids, skeleton bone braid, or bubble braid ghost are built for those costumes. Pumpkin, cat, bat, spider, or mummy: the matching bun or braid does the costume work for you. Under 10 minutes: pumpkin bun or spider bun. Twenty minutes and a patient kid: spider web braid or skeleton bone braid. Coily or short hair: puff ball pumpkins or the mummy wrap ponytail.
Whatever you pick, do the trial run the weekend before, pack two bobby pins and a spare elastic for repairs, and remember the rule that makes every one of these work: braids and buns hold, accessories decorate. Build the anchor first, add the spooky second, and the style will still look like the photo when the candy bag is full.
More seasonal looks in Occasion Hair.
Frequently asked questions
Related posts
See all posts
15 Graduation Hair Ideas for the Updo Versus Down Decision
Read more
15 Straight Hair Wedding Looks to Save
Read more
20 Sleek Graduation Hairstyles That Survive the Cap
Read more